We’re going to start out with a couple important questions: Have you ever captured a photo through water or glass and been totally let down by ugly reflections? Or perhaps your skies look flat and boring even on clear days. In these situations and others there’s a “ridiculously simple” solution that delivers reduced glare, clearer skies, and vibrant colors straight out of the camera.
Here’s how instructor Anthony Crothers explains his goal for today: “I’ll show you why a circular polarizing filter is one of the most power yet underrated tools in photography, and how to use it like a pro.” Once brings you up to speed in barely four minutes your outdoor photos will have more punch and clarity forever more.
Crothers’ popular YouTube channel is all about helping beginner and intermediate shooters build confidence and improve their skills one video at a time, and today he uses several landscape shots to illustrate why this little accessory should be your best friend. As you’ll see, the polarizer differs from most filters because of its rotating ring than enables you to adjust an image to perfection.
You may be surprised to learn that the value of this essential filter transcends scenes with water or glass. In fact, it will also dramatically darken pale blue skies and increase saturation of subjects like flowers and birds when micro reflections can easily mute their beautiful colors. Simply thread one onto your lens, follow Crother’s advice, be aware of a few possible mistakes, and you’ll super impressed by the results.
Crothers explains that as you rotate the front ring on the filter it blocks certain light rays from hitting the camera’s sensor. This isn’t about darkening a photo, but rather “transforming how the camera sees light. As the episode proceeds you’ll also learn several creative uses for your new friend.
Crothers describes the impact on exposure, and why your angle relative to the sun is another important consideration. And the best part is that all the filter’s benefits are visible in the viewfinder as you rotate its front ring right or left to increase or lessen the effect.
And don’t miss the related tutorial we featured with a post-processing expert who reveals a simple Lightroom/Photoshop trick for fixing photographs with uneven polarized skies that have blotches and harsh transitions.
If you want a simple post-processing method for creating unique landscape photos that stand out from the crowd, we’ve got you covered in the next five minutes. Instructor Scott Davenport does the trick by demonstrating how to imbue images with a soft, dreamy twilight glow that can’t be ignored.
Davenport is an accomplished landscape photographer and post-processing instructor whose popular YouTube channel is devoting to shooting techniques and editing methods that are appropriate for beginners and experienced shooters alike. Today’s quick episode explores how easy it is to craft this beautiful look in Lightroom using a simple, effective set of three color curves.
The goal of this straightforward edit is to retain a believable, atmospheric look by gently lifting the red channel, pulling down the greens, and subtly raising the blues. He promises that “these targeted adjustments shape color, and light in a natural way, giving you a peaceful, cool-toned glow without pushing things too far.”
Davenport says this selective tweak is particularly useful when your scene includes a strip or band across the frame like a mountain range or other prominent element. It’s one of those “finishing touches” that involves nothing more than a simple mask or two to transform a shot from meh to WOW!
His demonstration image is a beautifully composed landscape shot with a clearly defined foreground, snow-capped peaks across the middle, and a beautiful pink-and-blue sky overhead. The original photo looks pretty great as is but watch the spectacular transformation that occurs after making a trio of simple color-curves adjustments.
Once Davenport determines the specific effect desired, he limits the enhancements to a precise band across the mountains using a pair of linear gradients. The technique involves positioning one gradient from the top down and another from the bottom up, “intersecting them to isolate the band to where the fading twilight kisses the peaks.”
The beauty of this tidy approach is that it enables you to keep the effect where is really matters while retaining clean shadows below and the pretty sky above. Davenport’s instructional YouTube channel offers many image-editing videos like this one, so don’t forget to takes a close look.
And be sure not to miss the related tutorial we posted from another popular instructor who demonstrates how to transform drab landscape images into jaw-dropping photos by adding natural-looking light rays in Lightroom Classic.
I think this sits firmly in the “make photography fun again” camp – not that it isn’t fun, but you know, it’s pretty easy to get into a proverbial slump sometimes.
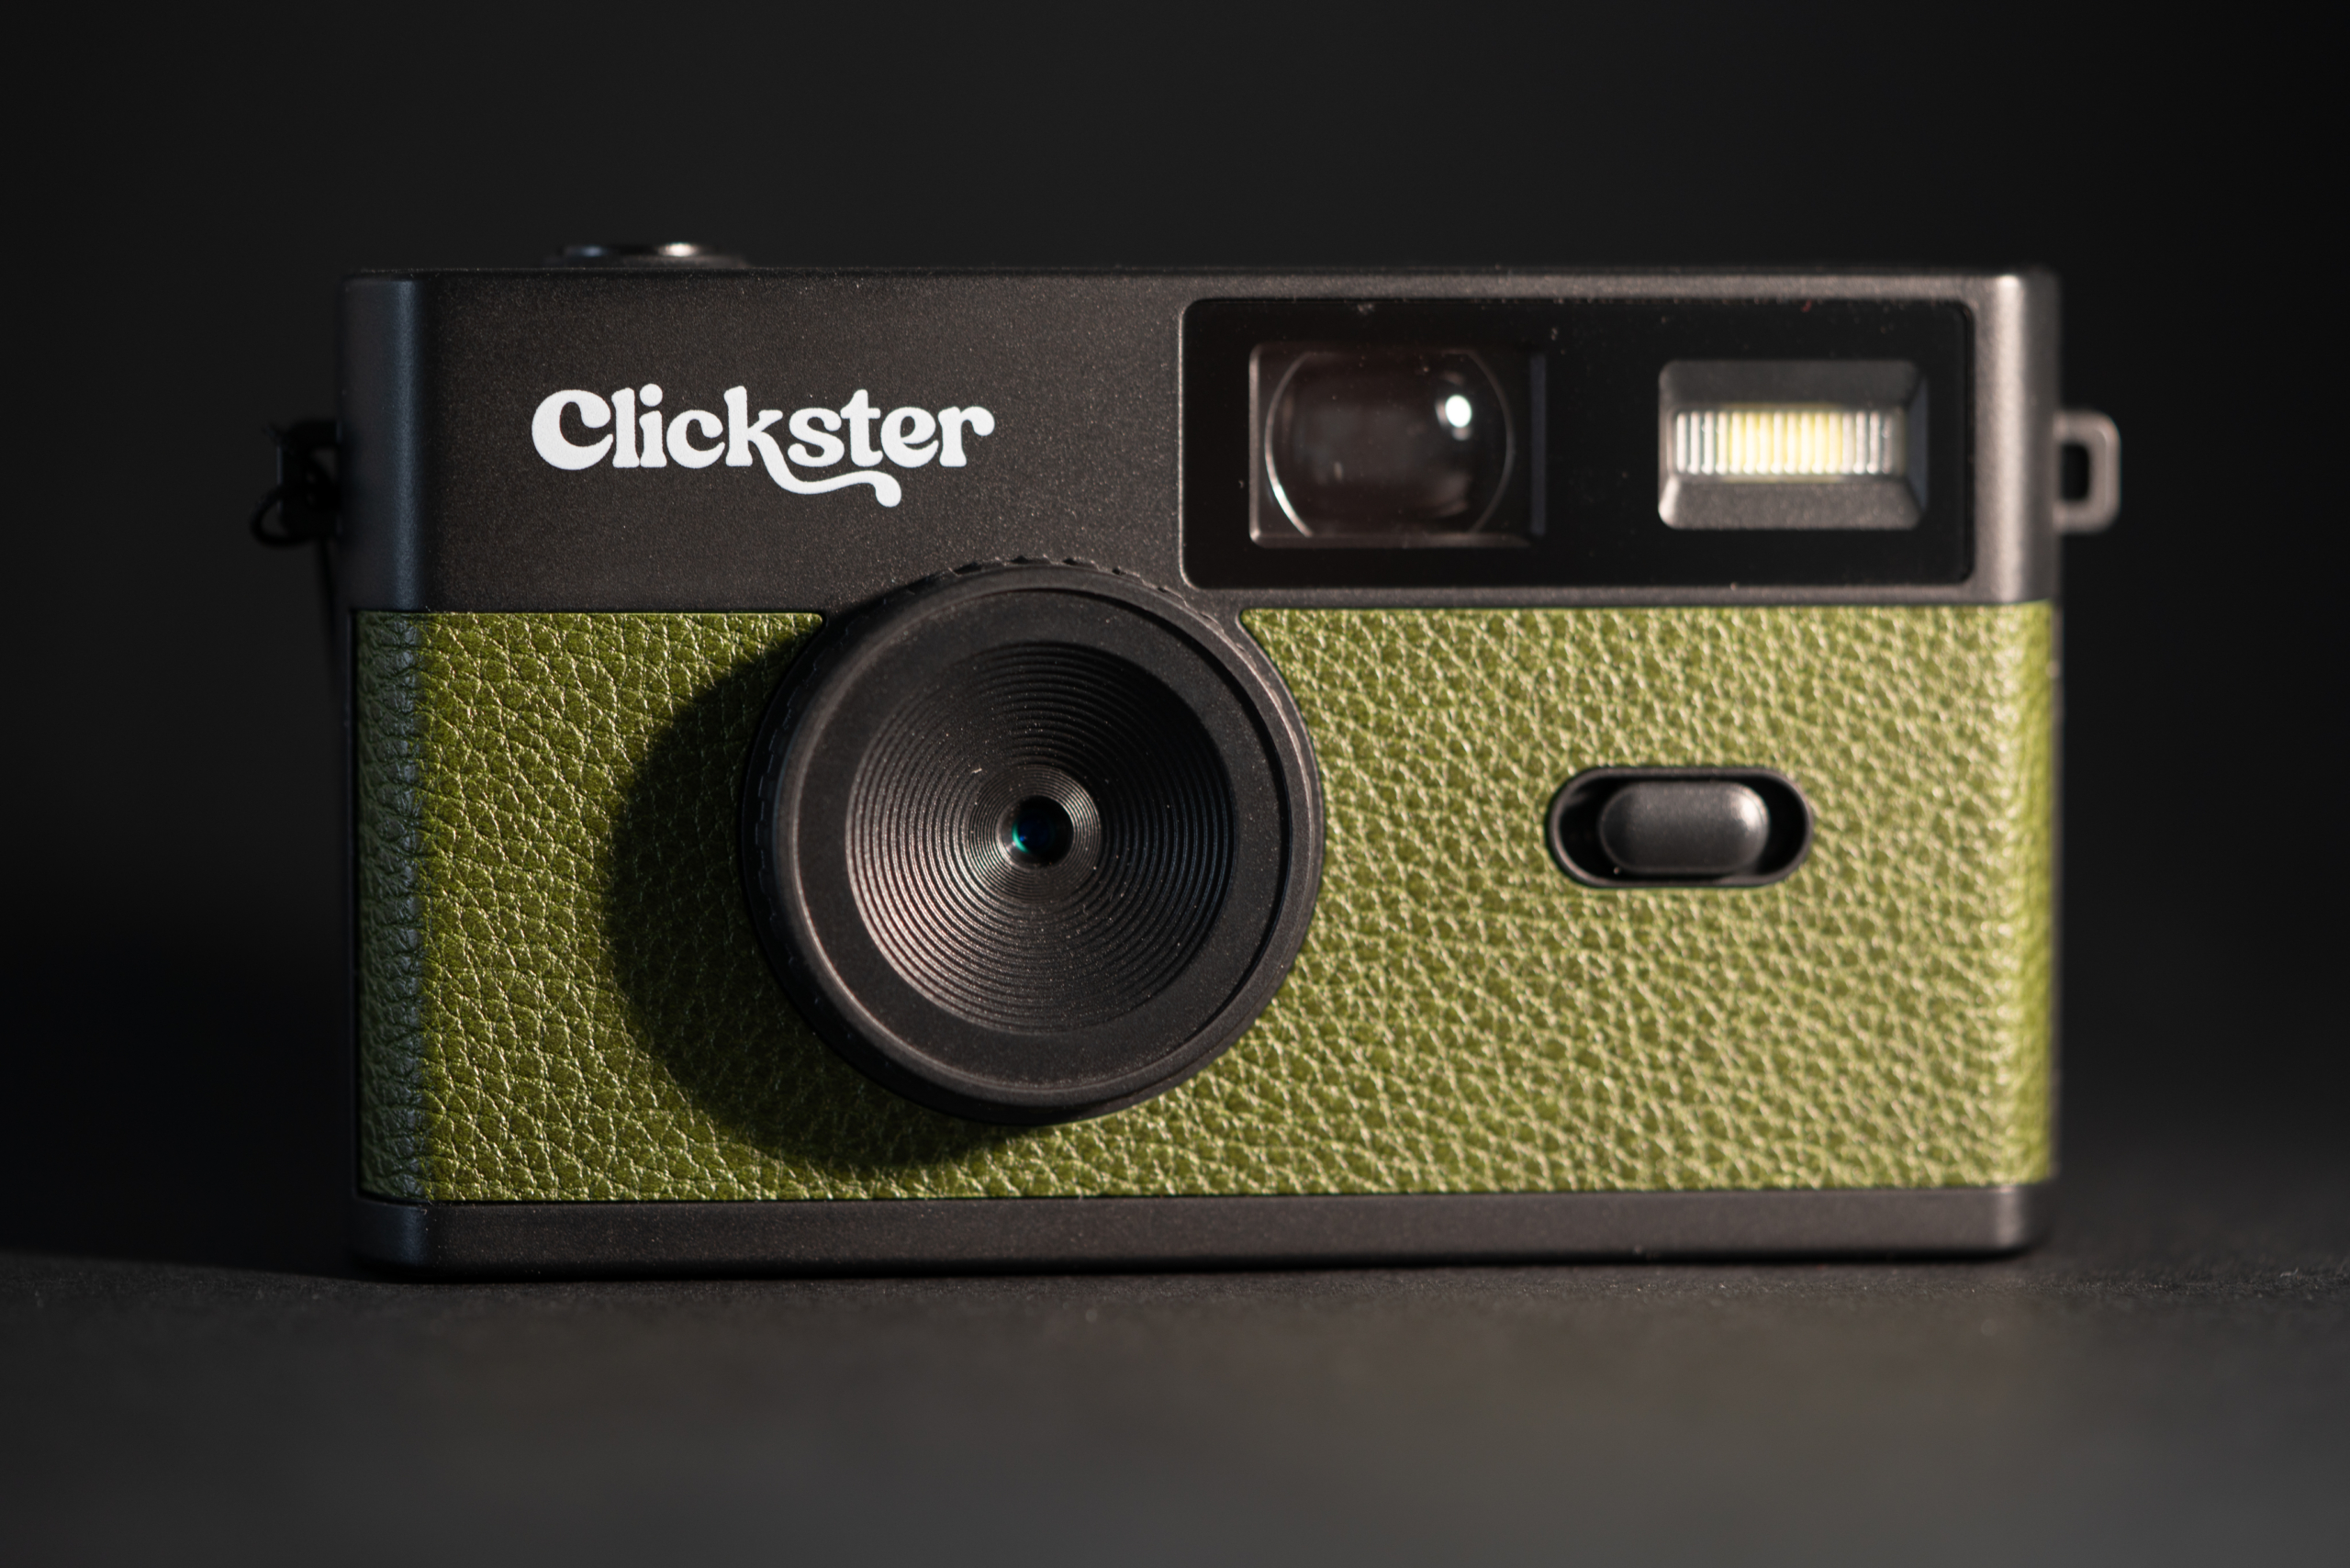
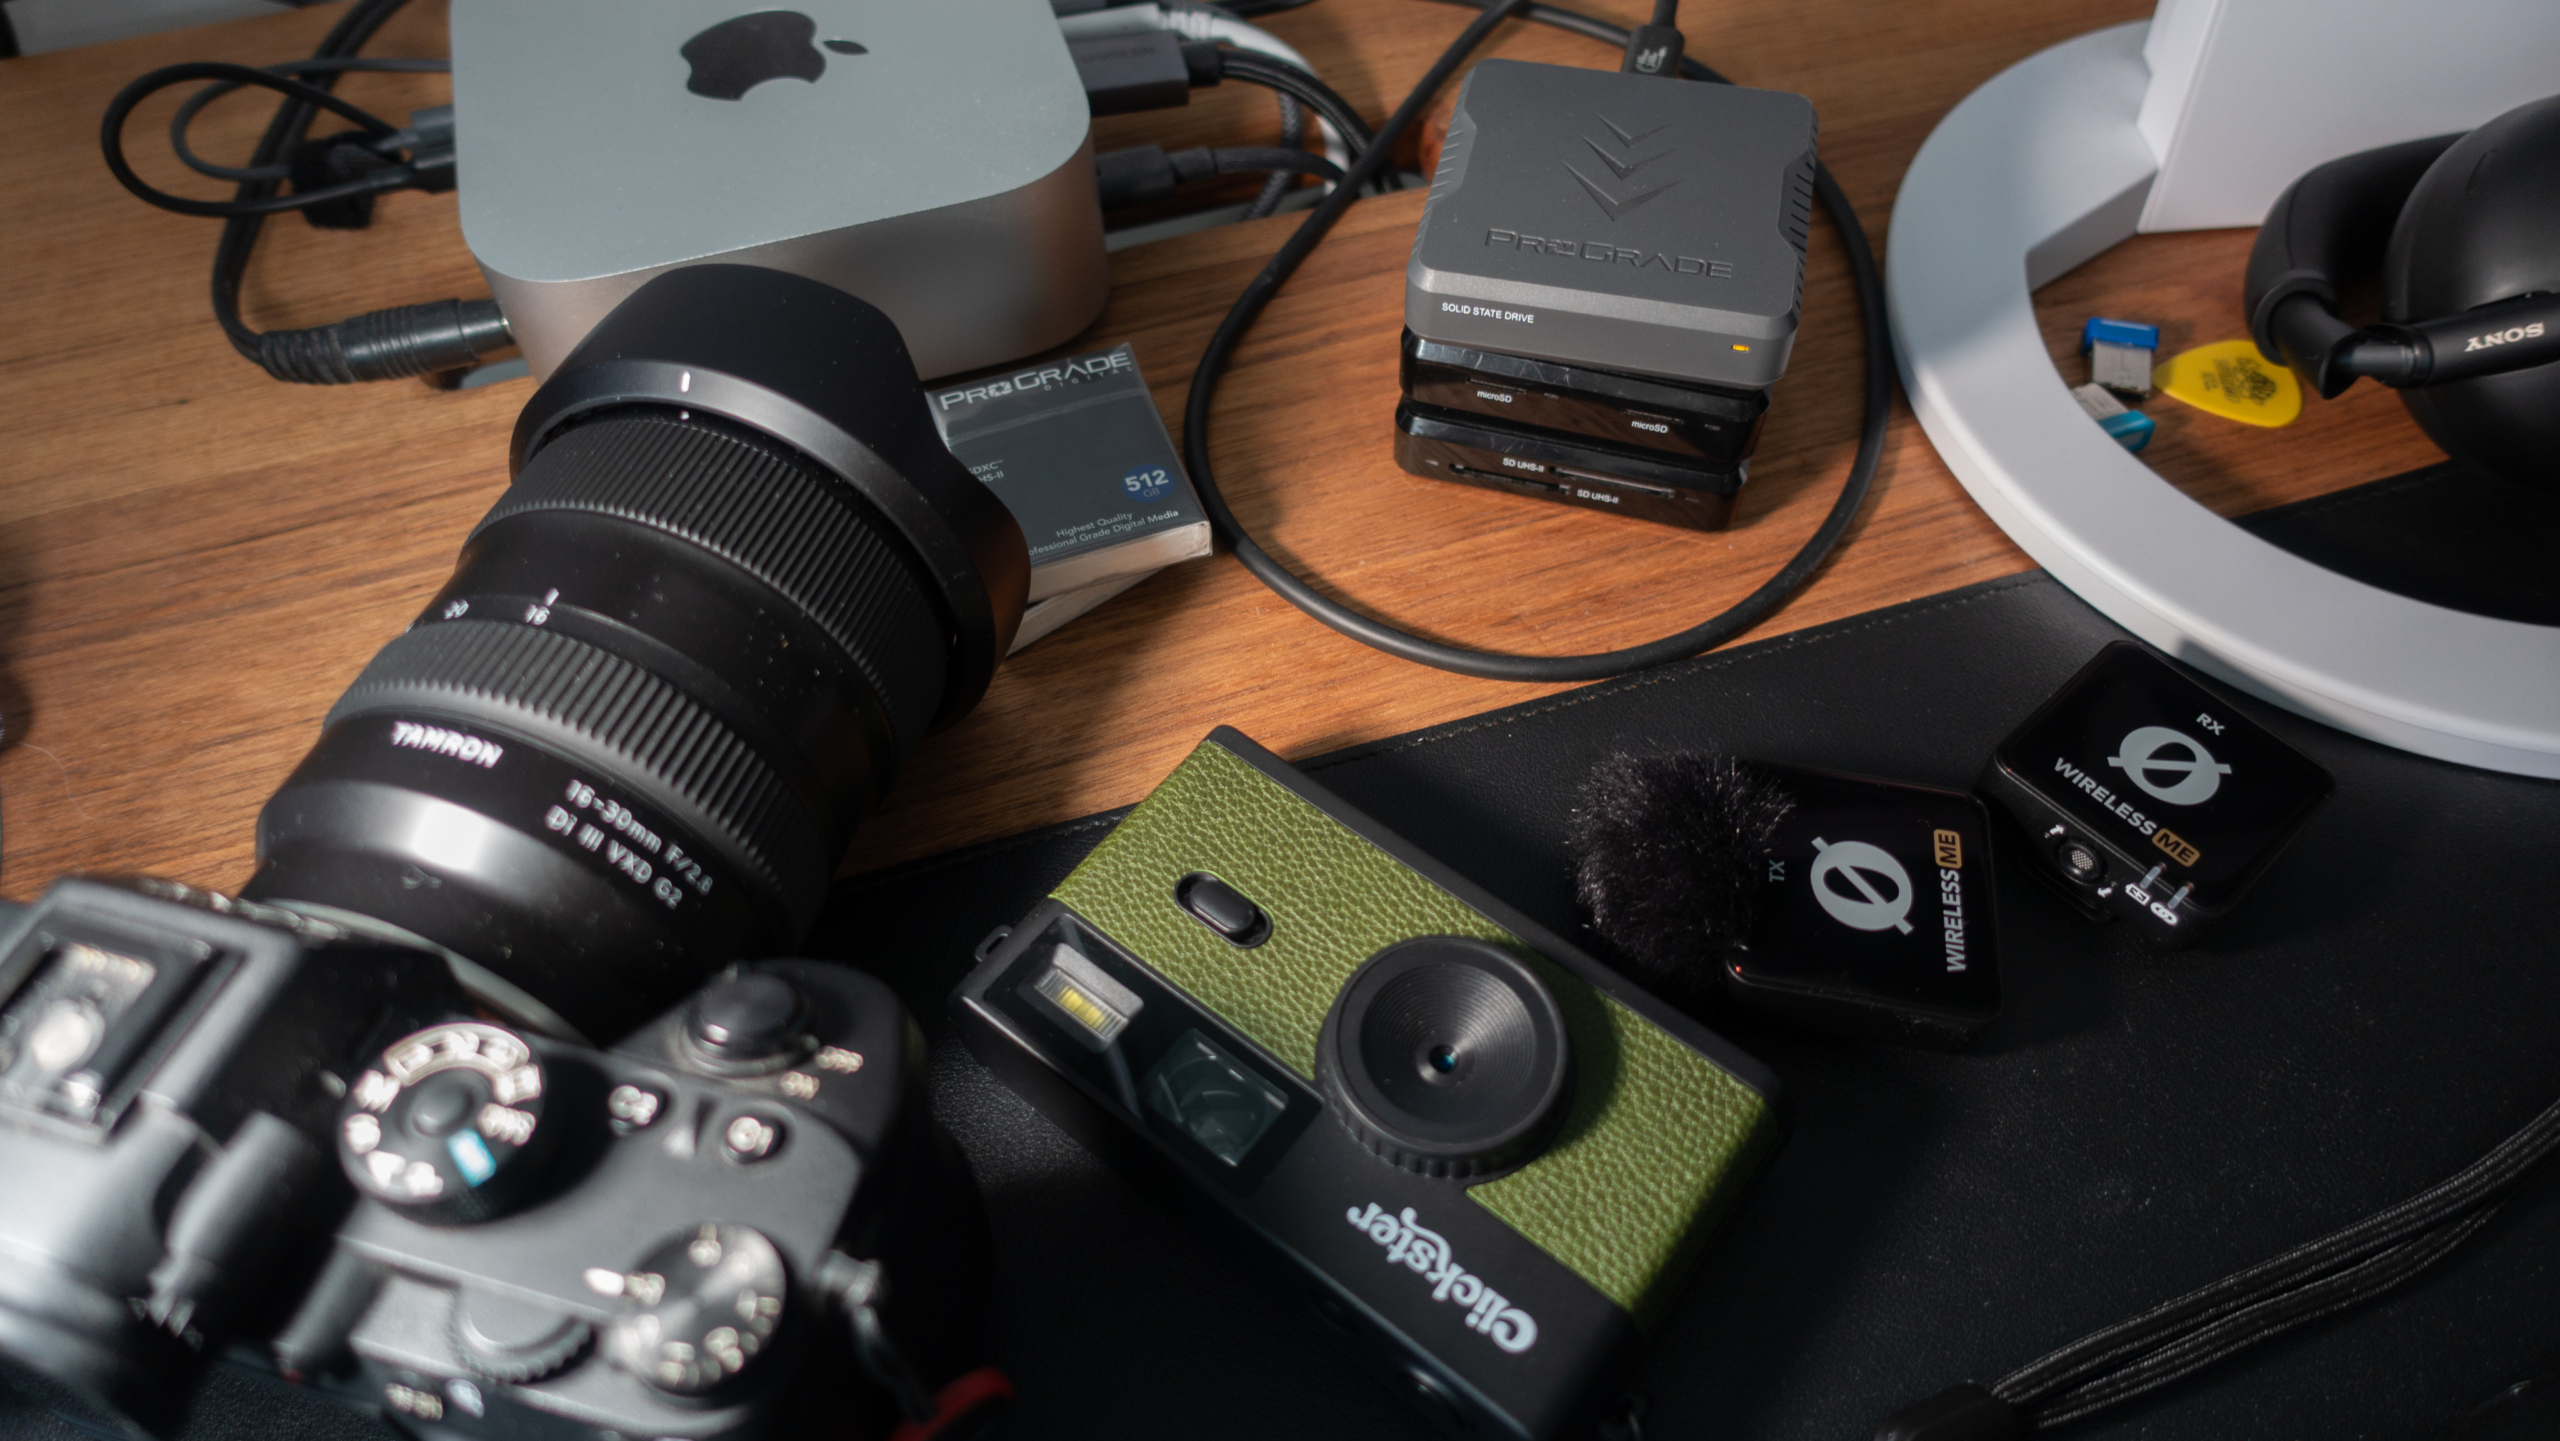
So the team at Clickster Camera sent us across this little gem to have a play with! It’s a super-simple digital camera, but, it has NO screen! It comes with a memory card and you can shoot a couple of thousand frames before you need to empty the card. It’s kinda like a modern day point and shoot film camera, but you don’t need to send it off to be developed.
The fun, for me at least, is that you take it out for a day, you make all of your photographs, and then, when the time is right, you plug it into your computer and ‘see what you got!’ that anticipation of not knowing, you don’t get to review in camera, you don’t get to check it out via your phone – you have to wait!
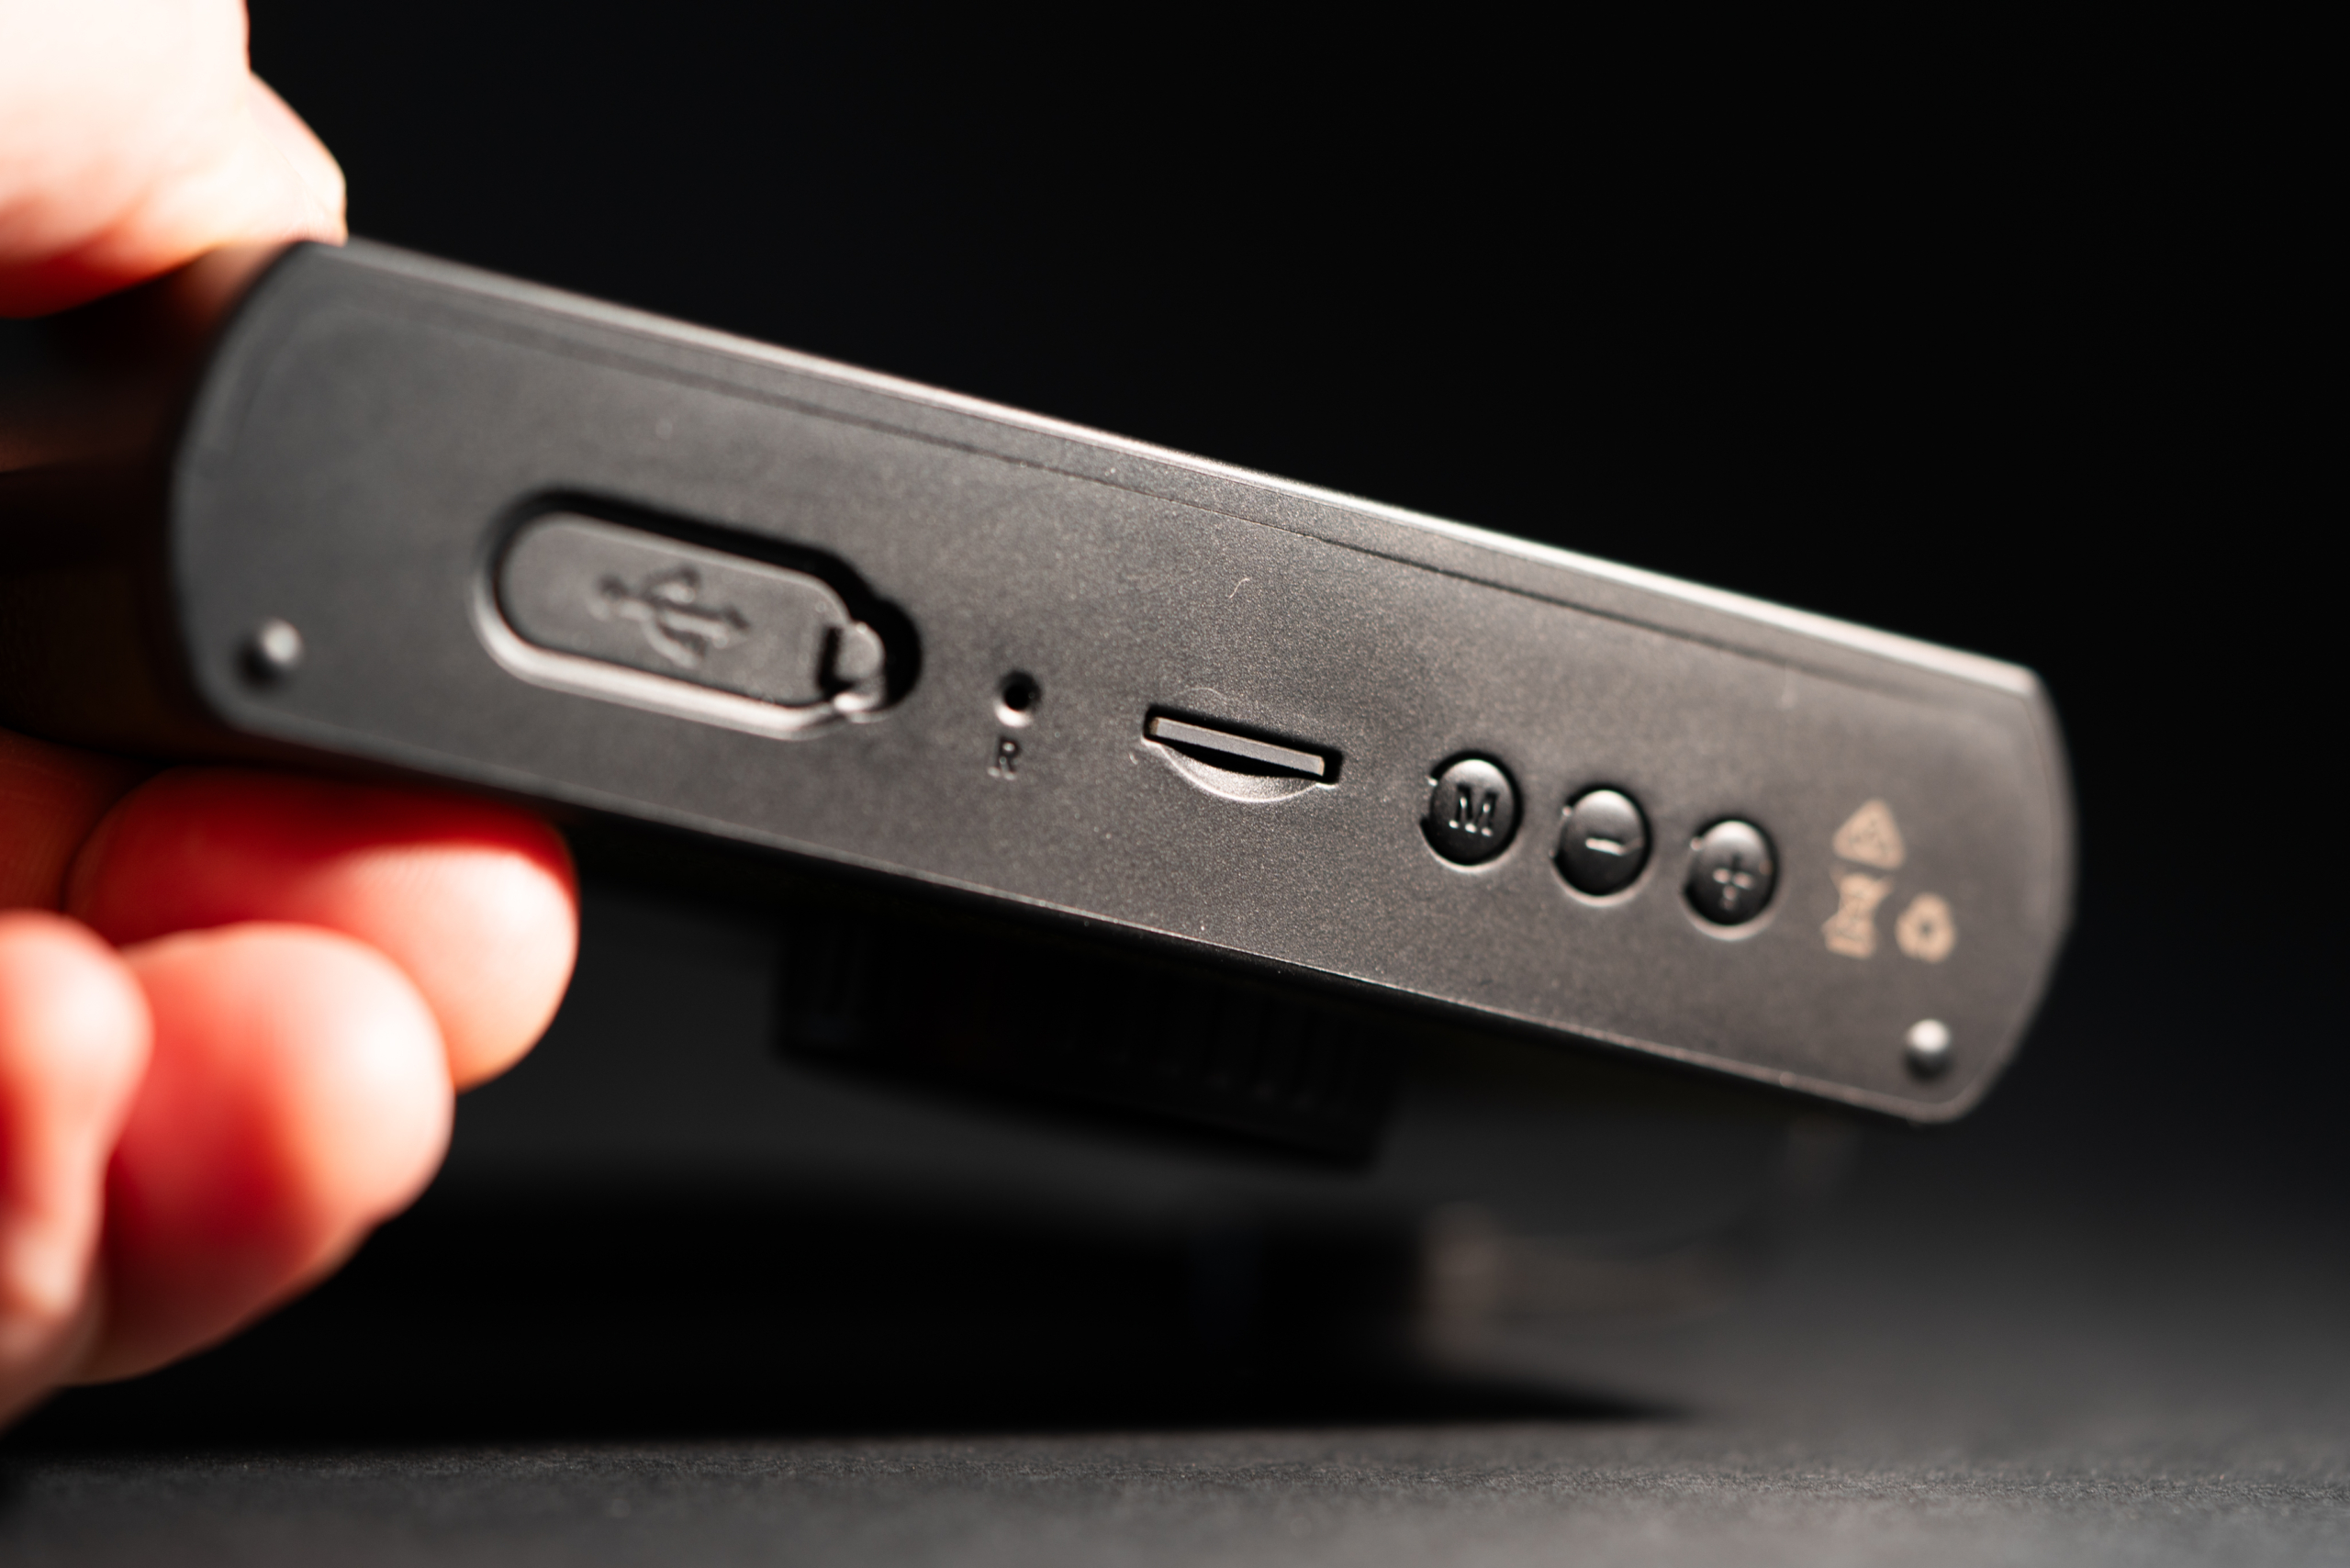
It’s as simple as this, here’s pretty much everything in the instruction manual for the Clickster Camera – It has an off/on button, a shutter release button, a USB-C plug for charging and getting your photos off. Right next to the USB-C port you will find an ‘M’ button as well as a + and – They’re for setting the date on your camera. There’s a button on the back where the little digital display is, that is the mode button – you have three options, Mono, Retro and Classic, and if you hold that button in it turns the beepy sound off / on. On the front of the camera (the photo up the top) you can also see the LED flash on/off button.
All you have on the display is what mode you’re in, your battery life (around 500 frames, that’s a lot!) as well as how many frames you’ve taken and the sound on or off icon – again, simples!
It’s a dead simple camera, very easy to use in good light, less than ideal results in the dark unless you’re on a tripod, but then (for subjects in close) you use the flash and you’re cooking with gas, well, LED, but you get me…
Pretty much child-proof and only $120 – well worth a shot! Enough of my rambling! Check out this little video from our friend Andy on his time with the Clickster Camera! (Sub to his Youtube while you’re at it)
Do we think the Clickster is better than the Fujifilm? Well that all depends, doesn’t it? You could grab one and try it out for yourself!
We found them online in Australia for $119 at Teds, Camera House etc, a quick Google should have you up and running.
I’ve been fortunate enough to have been using the new lens for the last few days, thanks to Blonde Robot, Australia’s Tamron distributor ?? While I haven’t had a chance to take it out and spend some time with it yet (hope to over the next few days) I went to the EV Show here in Melbourne and took it along – It’s true of any wide lens, you can warp reality if you try just a little bit! So I had some fun being creative with fast electric cars.
I thought I’d share this video from Michael Ronin (I can confirm he did give the lens back haha) as he takes the ultra-wide and walks you through it in his video. Enjoy!
Do you think an ultra-wide has a place in your camera bag? Do you already have an ultra-wide? Tell us in the comments.
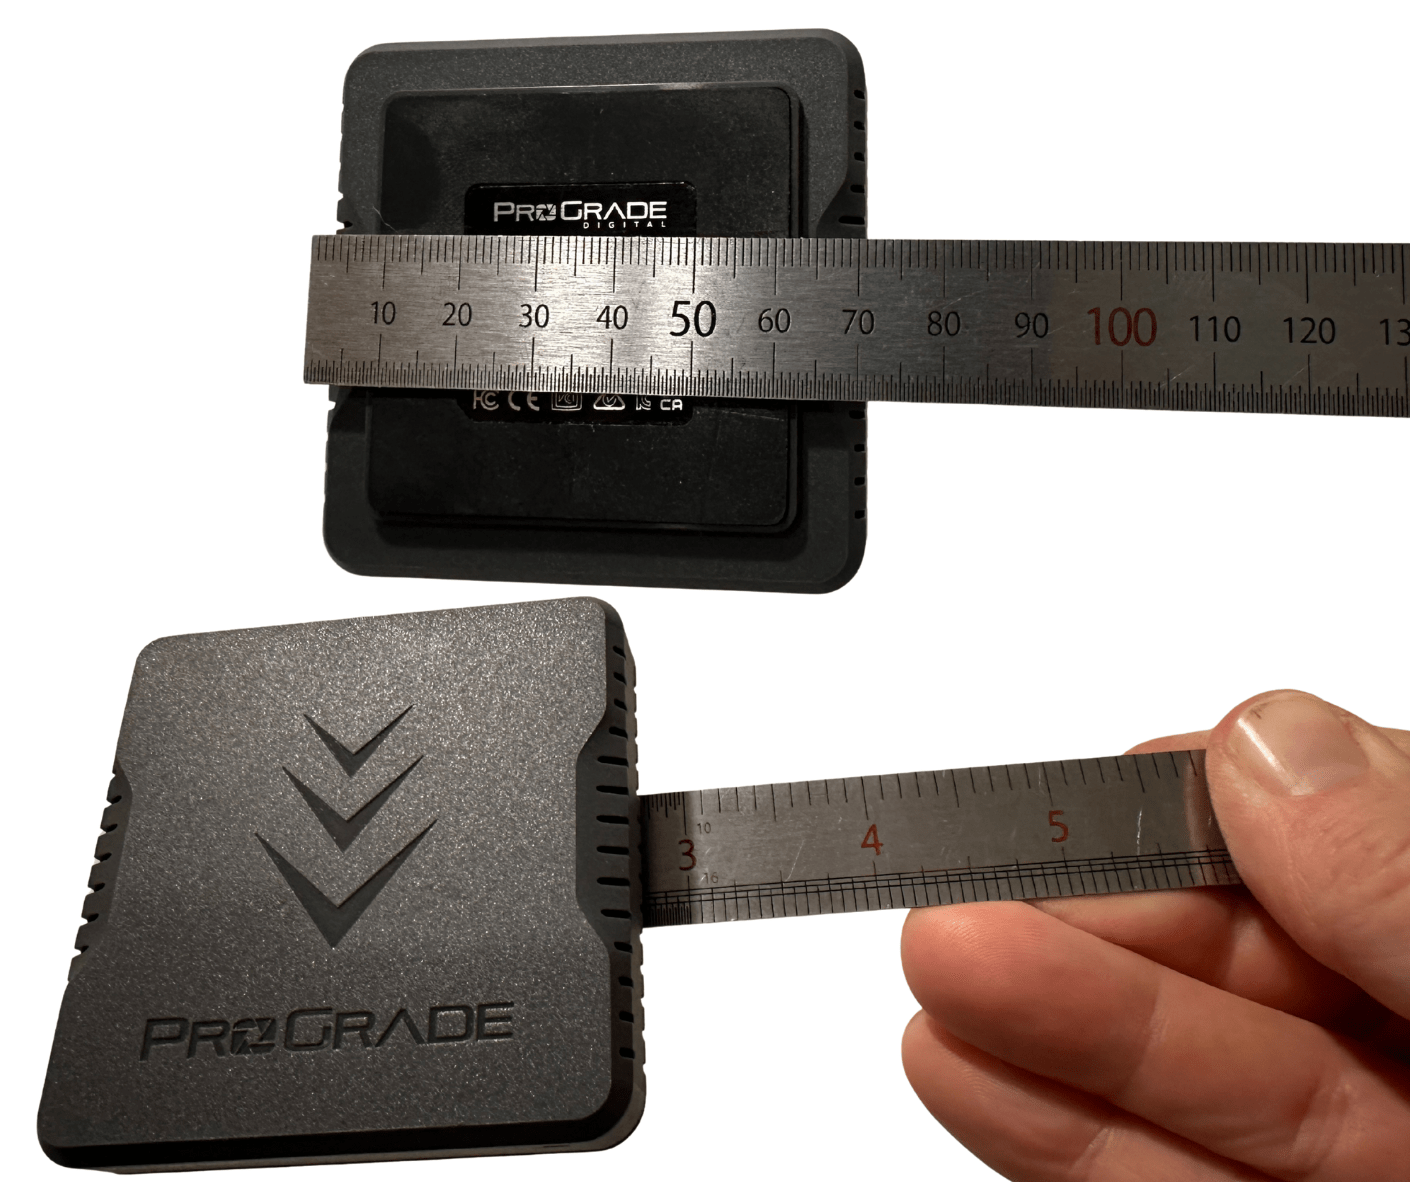
The team over at ProGrade sent us their ProGrade PG10.5 Pro Mini SSD to try out!
ProGrade PG10.5 Pro Mini SSD
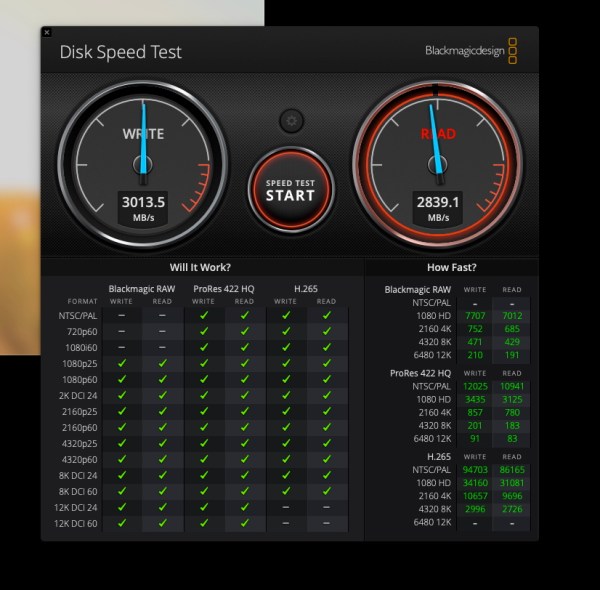
The ProGrade PG10.5 Pro Mini SSD is a compact, high-speed external drive designed to fit seamlessly into ProGrade’s existing workflow system. It features USB 4.0 and suggests up to 4,000 MB/s read speeds and 3,500 MB/s write speeds, which, if you know much about file transfer speeds, is pretty darn quick! So even the largest files from the most modern digital cameras are no match… Super quick! I ran a quick test with the Black Magic disk speed test software and it did very well!
Real world? It’s much faster when connected to my little Mac Mini M4 than any other disk I currently own, including my other 2tb SSD. The USB 4.0 really does the trick.
Black Magic Disk Speed Test of the ProGrade Digital SSD
What are the main features?
Blazing Speeds: Well obviously speed is a big factor here, SSD via USB 4.0, if your computer can handle it, is going to be the driving force behind most people purchasing this little guy.
Sustained Performance: An import via my ProGrade card readers directly into the ProGrade PG10.5 Pro Mini SSD: certainly moved the regular bottle-neck of file import away from the saving to disk part of the process! 400 90mb RAW files from my Sony a7R imported smoothly and quickly. – USB 4.0 interface provides transfer rates of up to 40Gb/s (5GB/s)
Compact Design: Big in performance, small in footprint? ProGrade PG10.5 is well about 3″ or 70mm square, oh, and it’s magnetic, so you can attach it to things (Like the Prograde Pro Hub) as well as the included stick-on metal plate that you adhere to (for example) your laptop lid so it can be fixed there while you’re working on the go.
Durability: A sturdy little beastie, the Pro Mini SSD is X-Ray and Shock proof (I still won’t loan it to my 15yo…!) and also comes with a very sturd feeling, certified high-speed USB4 cable.
So who is it for?
Beginner to Intermediate Photographers: If you’re transitioning from basic storage solutions and require faster, more reliable storage for larger files, the PG10.5 is a worthy investment.
On-the-Go Professionals: Its compact size and rugged design make it perfect for photographers who frequently travel or work on location. If I was still a music photographer, this thing would LIVE in my bag – perfoect form factor, speed and damage resistant.
Workflow Integration: Like me, if you already use the ProGrade readers (I use the SD and MicroSD for my drone) the PG10.5 is a no brainer to keep everything all in the one place.
Pros & Cons?
Price Point: While offering top-tier performance, the PG10.5 comes at a premium price, which might be a consideration for those on a tight budget – After weeks of solid use, the SSD hasn’t skipped a beat and continually surprises me with its speed – you get what you pay for I guess!
Platform Compatibility: Compatible with Thunderbolt 4, Thunderbolt 3, USB 3.2, and 3.1 Type-C ports
My final thoughts
The ProGrade PG10.5 Pro Mini SSD is a high end solution for those wanting to “do it well, do it once” it isn’t cheap by comparison to some external storage solutions, but it does offer excellent speed, form factor and also has a 3 year warranty.
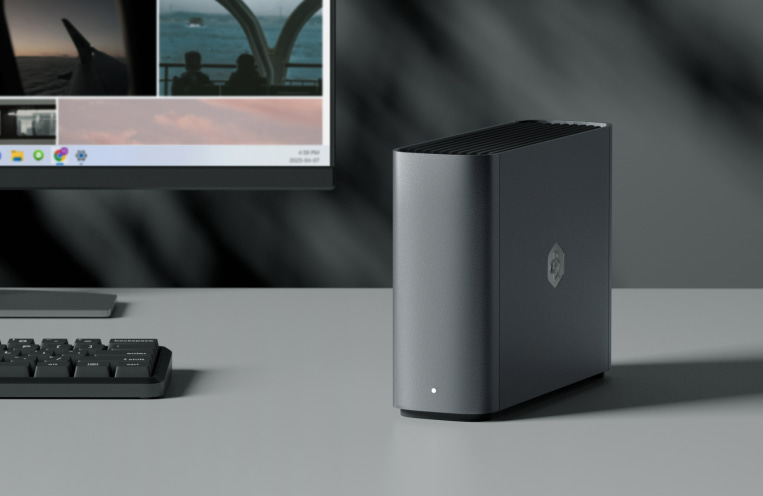
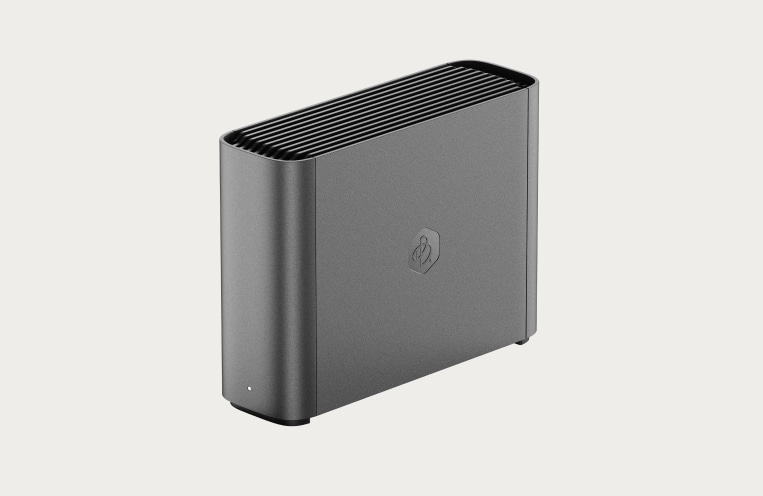
We have posted many times on the benefits of backing up, external storage vs NAS etc, and we have also spoken many times on the benefit if the Synology NAS, and while it’s true, backing up and storage IS for everybody, not everybody wants or needs to get super complicated with it! A simple solution is something like a directly attached disk, but if you want to go one step better, allowing you much more freedom to backup multiple devices without having to get super-nerdy, maybe this Synology BEE Station Plus is a great option for you to consider?
Synology shipped us an 8TB BeeStation Plus to configure and use for the purpose of this review.
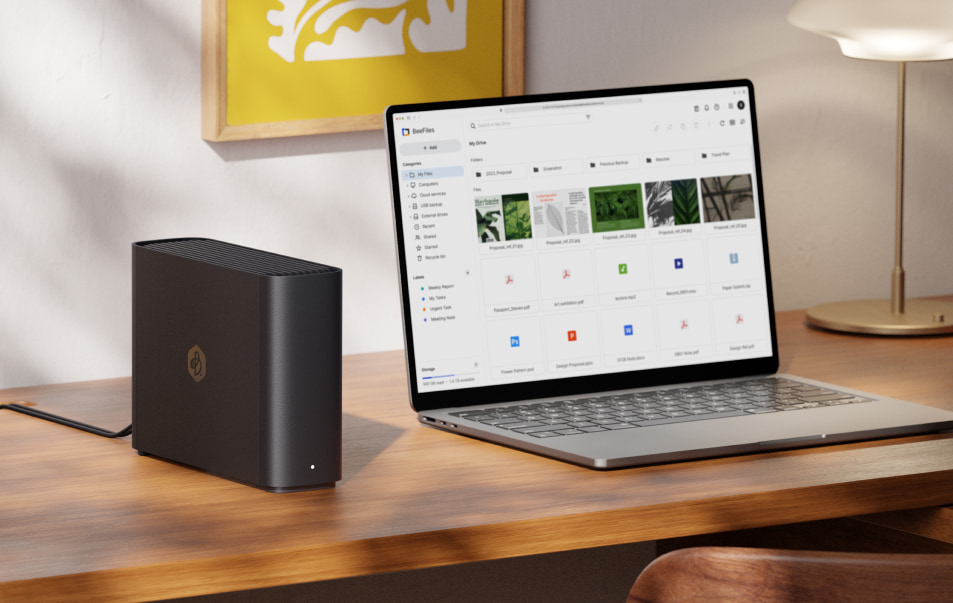
If you’re an amateur photographer shooting more than just the occasional weekend snap, your digital photo collection has probably already started ballooning! Whether you’re capturing RAW files with a mirrorless camera, shooting time-lapses, or backing up phone pics for your growing portfolio, managing your files becomes critical—and that’s where the Synology BeeStation Plus 8TB steps in.
Unlike general-purpose external hard drives, the BeeStation Plus is your own, private personal cloud storage device, giving photographers a reliable and private place to store, access, and share their images—without the monthly fees of cloud services like iCloud, Dropbox or Google Drive. But how exactly can photographers take advantage of it? Here’s how you can make the most of the BeeStation…
1. Easily Back Up Your Photos
The BeeStation Plus connects directly to your home network and runs 24/7. That means your photos can be automatically backed up from multiple devices—including your desktop, laptop, and even your phone.
For example: You’re editing in Lightroom on your main computer, but you’re also snapping mobile shots with your phone. The BeeStation Plus can back up both sets of images automatically using Synology’s apps (like BeePhotos and BeeFiles). It’s especially handy if you’re on location a lot and want peace of mind knowing your files are being saved as soon as you connect to Wi-Fi.
2. Organise Your Library Like a Pro
The BeeStation Plus isn’t just about dumping files—it lets you organise your entire photo library. Tag images, sort them into albums, and search by date, keyword, or device.
Why it matters: Over time, finding that one shot from a trip three years ago gets harder. BeePhotos’ AI-powered organisation makes image retrieval faster, so you spend less time searching and more time editing.
3. Share Albums with Clients or Family
You can share galleries or folders directly from your BeeStation Plus with a secure link, letting you control who sees what—and whether they can download, comment, or upload their own files.
It’s more professional than uploading to Facebook, and you’re not handing over any rights or quality to social media compression.
4. Edit from Anywhere
Because it’s cloud-connected, the BeeStation Plus lets you access your RAW or JPEG files from anywhere. Using apps like Lightroom or Affinity Photo, you can download files straight from your BeeStation Plus while you’re travelling or at a café.
Example Scenario: You’re away on a weekend shoot and need to prep a few selects for social media or a blog post. You can grab them directly from your BeeStation Plus using Synology’s mobile app.
5. Free Up Space on Your Devices
Between massive RAW files and 4K video clips, storage fills up fast. Offloading older or completed projects to your BeeStation Plus means you can keep working efficiently without clogging your internal drive.
Extra Tip: Use folders labelled by year, client, or project type to streamline your workflow.
Final Thoughts
For photographers looking to level up their file management, the Synology 8TB BeeStation Plus is more than just a digital shoebox. It’s a private cloud, gallery hub, backup tool, and workflow enhancer all in one. Best of all, it requires no advanced tech knowledge to get started. Synology designed the BeeStation to be beginner-friendly—making it perfect for photography enthusiasts who want to spend more time behind the camera, and less time worrying about file chaos.
Oh and By The Way! Don’t forget to back up your BeeStation Plus itself! Use an external drive or cloud redundancy for critical files—no single solution is foolproof!
Maybe this is a controversial take, but here goes… I’d be keen to hear your thoughts! Leave a comment.
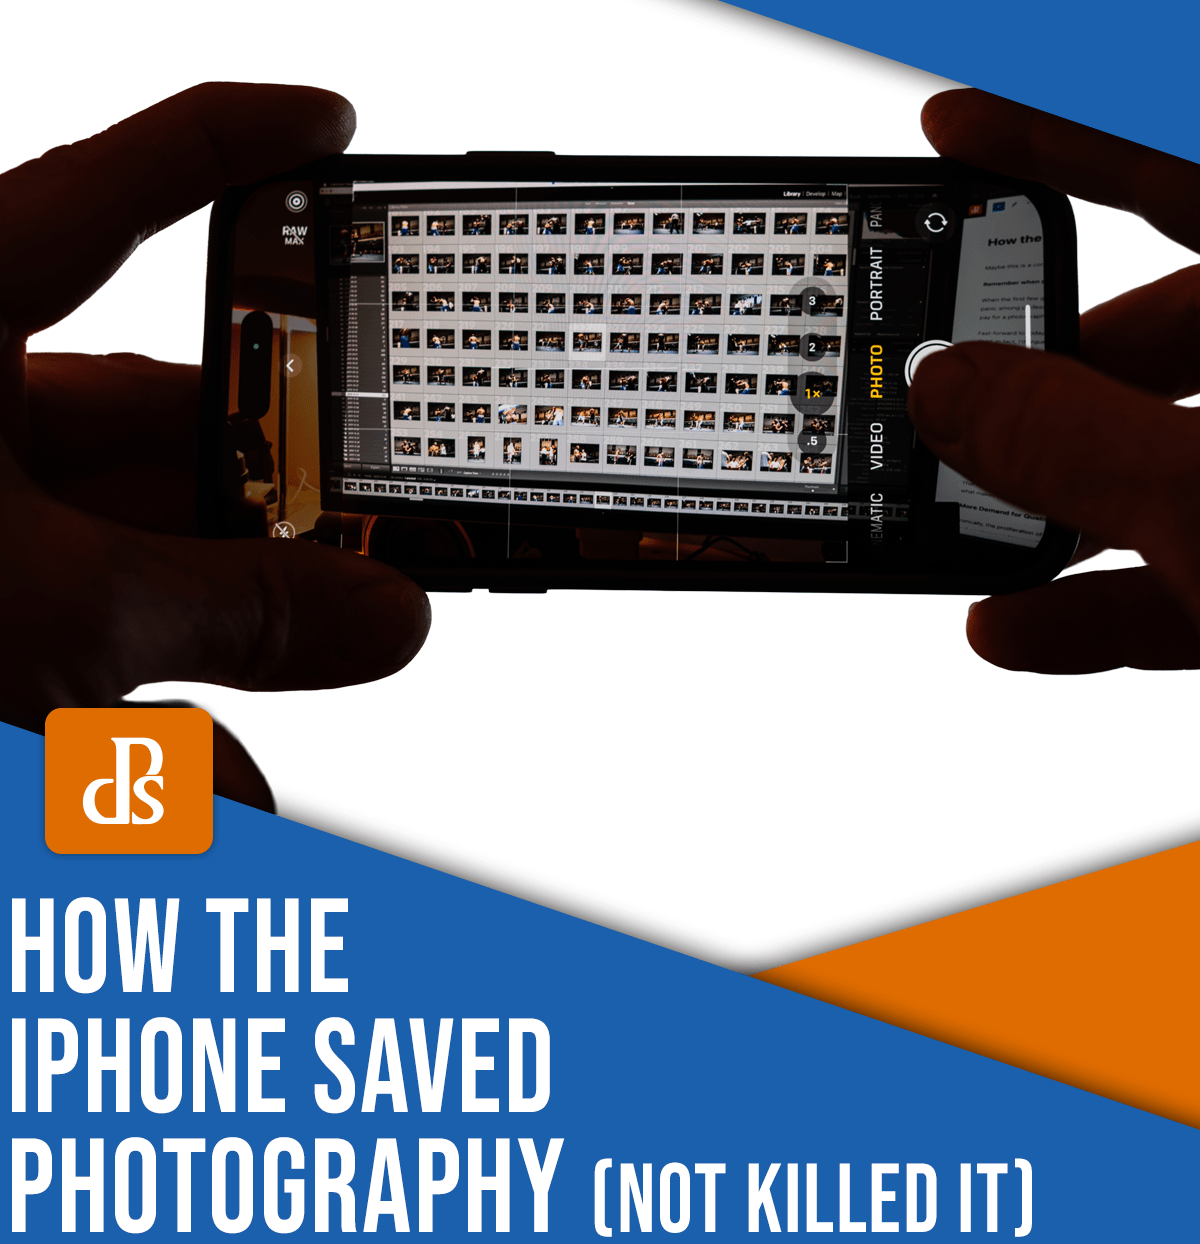
Remember when people were saying the iPhone would be the death of the photography industry?
When the first few generations of smartphones started adding cameras, there was a genuine wave of panic among professionals. The logic was simple: if everyone had a camera in their pocket, who would pay for a photographer?
Fast-forward to today, and we can see that while the industry has changed, photography is far from dead. In fact, I’d argue the iPhone has actually helped photography thrive in ways we couldn’t have imagined a decade ago.
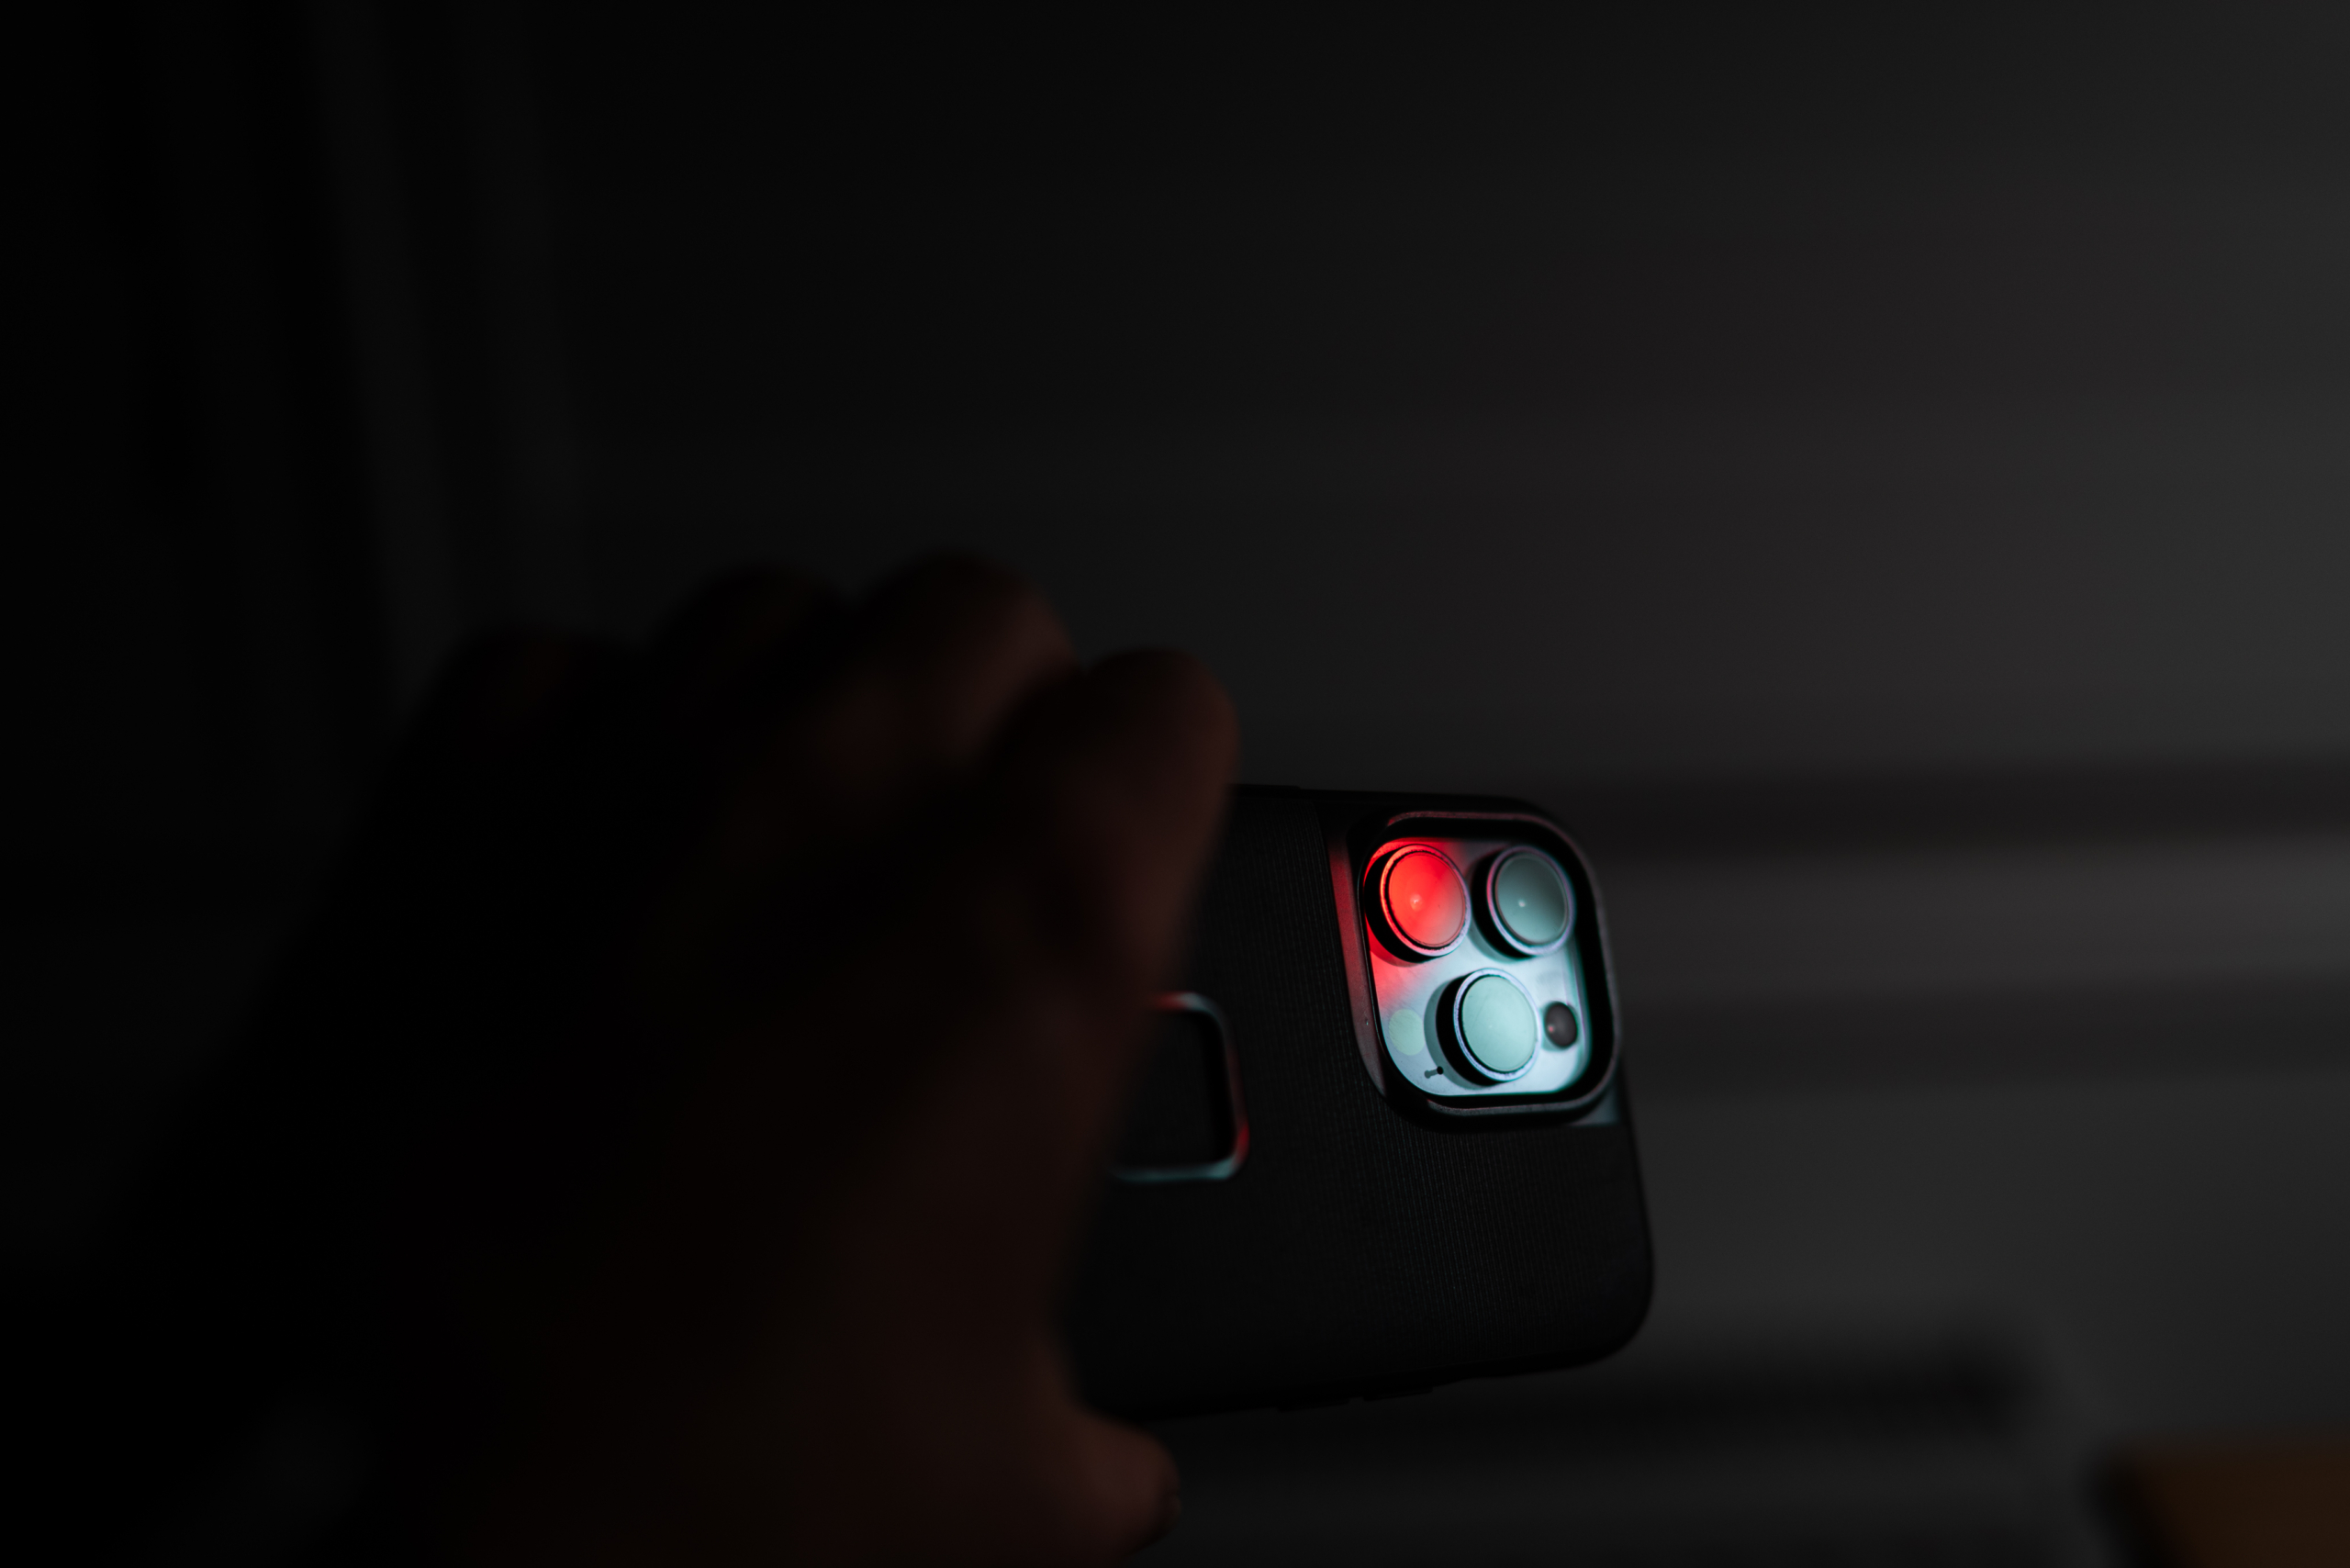
Hand holding an iPhone, no… really… it is!
Everyone’s a Photographer Now (And That’s Not a Bad Thing)
The barrier to entry used to be high. You needed a proper camera, some technical know-how, and access to darkrooms or editing software. Now? Just unlock your phone. Granted, a top of the line phone is no cheap ask, but it IS a phone first, not a camera, or is it? More on that in another article maybe…
Millions of people who might never have picked up a Mirrorless / DSLR are now thinking about light, composition, storytelling. They’re documenting everyday life, playing with perspective, and sharing it all with the world.
The result? A global explosion of visual creativity.
The Rise of the Visual Language
Thanks to smartphone cameras, visual communication is now as common as texting. We send photos to say “look at this,” “I was here,” or even “I love you.” In doing so, we’ve all become more visually literate. That helps the whole industry, because the more people care about photos, the more they appreciate what makes a good one.
More Demand for Quality
Ironically, the proliferation of photos has increased demand for high-quality work. Brands, publications, and creators need images that cut through the noise. So while smartphones flooded the world with snapshots, they also raised the profile of skilled professionals who know how to craft an image with impact.
The iPhone as a Gateway Drug
Ask any photographer today how they got started, and chances are good they’ll say it began with their phone. The iPhone has become a gateway into more serious photography. Once someone realises they enjoy shooting with their phone, it’s a short step to learning about lenses, aperture, manual controls—and suddenly, they’re hooked.
Professional Tools in Your Pocket
Let’s not forget that the iPhone itself has evolved into a serious tool. Computational photography, RAW shooting, multi-lens systems—all built into a device that fits in your back pocket. It’s no longer just a casual snapper; it’s a Swiss Army knife for image-making.
My Final Thoughts
The iPhone didn’t destroy photography. It brought it to the masses. It made the medium more accessible, more social, and arguably, more valued than ever. The industry looks different now, yes—but it’s alive and kicking. Maybe even stronger.
What are your thoughts? Share them here in the comments or over on our Facebook or Insta
This article was updated in May 2025 with contributions from Simon and Lauren @ Tether Tools.
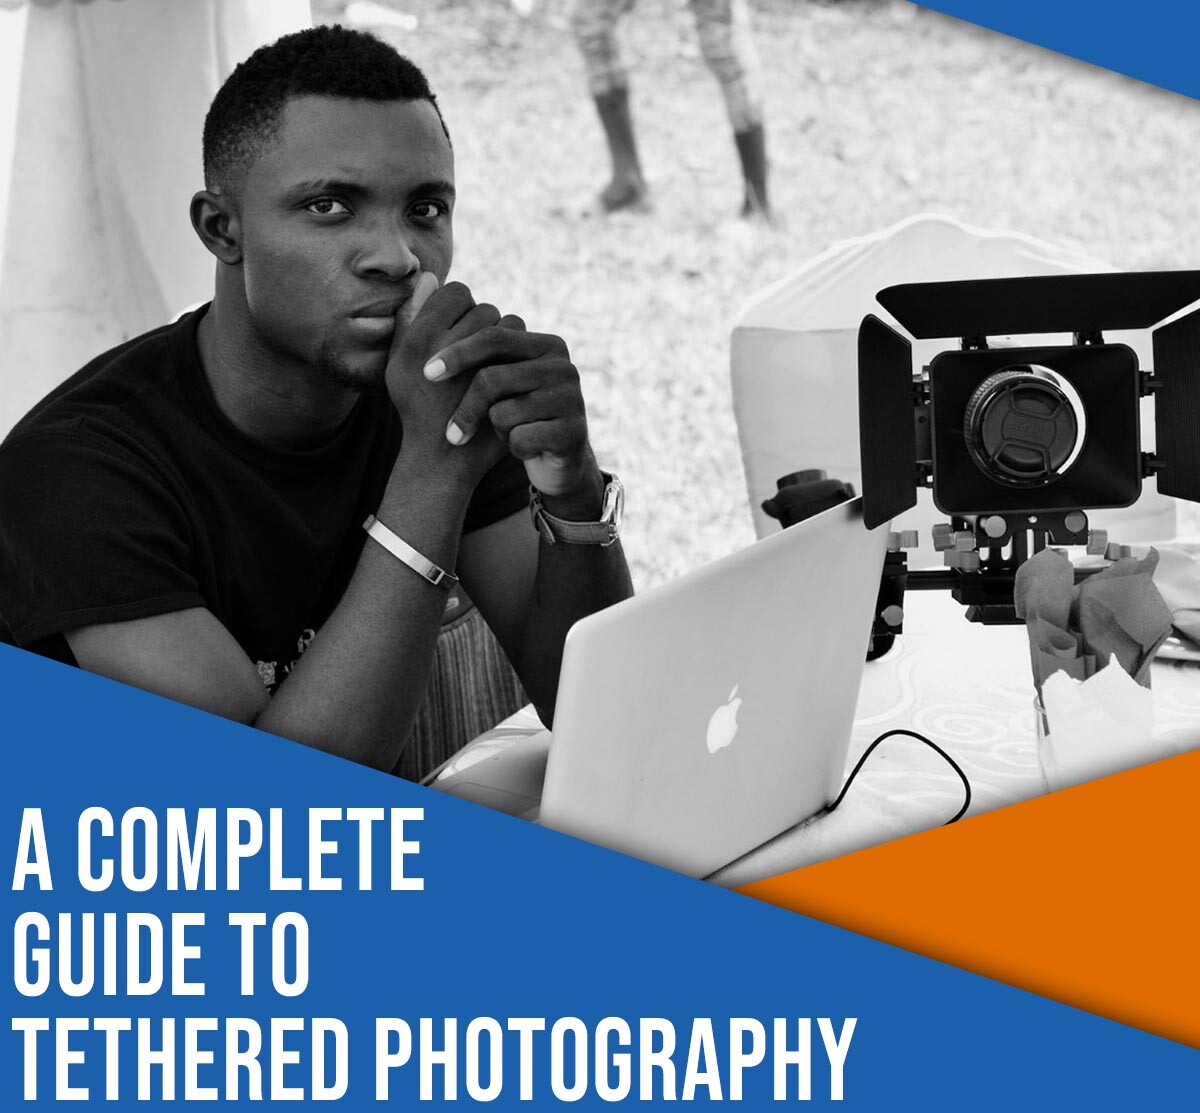
When I first delved into studio photography, I was so excited. I had my lighting, I had my camera and lenses, and I had some great subjects.
But after spending a few weeks shooting, I became frustrated. In the studio, every little detail counts. A blemish or piece of dust on a product, a slightly out-of-position light on a portrait, a too-powerful flash, an off-color ambient light; each has the potential to ruin the photo and make it useless to both you and your clients. Yet the camera LCD, and even the viewfinder, just didn’t offer large enough previews to check for these issues. I needed a better way to evaluate my studio shots. That’s when I tried tethering, and I immediately realized that it was the perfect solution to my problems.
So what is tethered photography? How does it work? And how can you efficiently tether your camera while shooting?
In this article, I explain everything you need to know about tethering, including:
How tethering can instantly improve your workflow
When you should (or shouldn’t) tether your camera
Two simple ways to shoot tethered
Let’s dive right in.
What is tethered photography?
Tethered photography is the process of connecting your camera to a computer, tablet, or even a smartphone via a cable or wireless app. Once you’ve successfully connected the devices, any new image captured by the camera is then passed directly to the computer and saved in a designated folder.
Therefore, as soon as you press the camera shutter button, you can see your image displayed (in high resolution) on the computer screen. If you’re tethering in a program like Capture One or Lightroom, you can even make adjustments to your file; for instance, you can boost contrast, convert the shot to black and white, and apply presets.
Many tethering programs allow you to adjust camera settingsfrom your computer, tablet, or smartphone – and you can fire the camera shutter from your device, too.
The benefits of shooting tethered
Tethering lets you quickly preview each photo on a large monitor within moments of firing the shutter button. That way, you and your client can scrutinize your shots on a big screen. You can check for perfect composition, focus, exposure, and subject blemishes – and your client can indicate what they like or dislike about each new file.
Depending on the tethering software you use, you might be able to apply various presets to the image, so as to better visualize the final (edited) result.
Tethering also lets you organize your images as you go along. In a program like Lightroom, you can add notes, star ratings, keywords, and more to each new photo. That way, you can stay on top of your file management, and you can record key information while it’s still fresh in your mind.
The downsides of tethered shooting
Tethering is great – but if you’re not careful, it can cause problems, too.
For one, you or your client might get too caught up in little details while inspecting the photos, which can stall a photoshoot. When tethering, it’s important to set expectations with your client. Let them know how you work and do what you can to set a steady pace.
Tethering can also suck the battery life out of both your camera and your connected computer. You should always carry extra batteries and – if possible – shoot near a wall socket in case you need to plug in your laptop. Tether Tools makes an external Camera power system that can give you all day uptime. It connects any USB battery pack to your camera through a battery coupler so you never have to stop your shooting to change batteries.
And tethering software is notoriously finicky. It sometimes stops working for no apparent reason, so you’ll want to get set up and take some test shots before your photoshoot starts (so you have time to troubleshoot). You should also have a backup plan, just in case.
Finally, tethering requires extra equipment, such as a lengthy cord and a laptop or desktop computer. So while it might be tempting to tether for on-location shoots, consider carefully before hauling along your expensive electronics.
Ultimately, whether you tether is up to you. It’s a great way to improve the final product – but it can be slow, plus it involves extra software and moving parts, so if you need to do a fast-paced portrait session or an outdoors product shoot, it might be better to shoot the “normal” way.
Tethering your camera: essential equipment
The traditional and most reliable way to connect your camera to a computer or another device is with a cable. There are a variety of different cables and ports available, so the specifics will depend on your exact devices. (For further information, check your camera manual.)
Some cameras even offer wireless tethering. The image transfer process can be slower compared to cabled tethering, but if you prefer to work without a cord, this is a great method to try.
I’d also recommend a portable table to hold your laptop such as the Tether Tools Aero Table, as well as a TetherGuard to prevent your USB cable from being yanked from your camera.
One thing to be aware of: with is the latest USB-C ports on newer cameras, USB-C 3.2 Gen 2, the port protocol is designed to transfer both power and data. Cameras with two USB-C ports may designate one port for power and one port for data/image transfer, so be sure you connect your tether cable to the right port. For cameras with only one port, you’ll want to turn off camera power in your camera settings so that power is not sent or received through the USB port while tethering. Another option is to use a cable that does not have Power Delivery (PD) to ensure the power does not conflict with data transfer.
The Aero Table is a lightweight, durable, aluminum platform that attaches to almost any tripod or light stand. It’s a great way to hold a laptop when tethering!
If you’d prefer to tether wirelessly, then you can forgo the cable and the Jerkstopper – but you’ll still need the laptop, the table, and the tethering software.
How to shoot tethered: step-by-step instructions
In this section, I explain how to tether with two low-cost, simple programs: Adobe Lightroom and EOS Utility. I’m assuming you’re tethering with a cable (the process is similar when tethering wirelessly, albeit with a few extra wireless activation steps when starting out).
Shooting tethered in Lightroom
If you already own Lightroom, the quickest way to get started tethering is with the Lightroom Tethered Capture feature.
Step 1: Connect your camera to the computer
Make sure your camera is turned off. Connect one end of the cable to your camera and the other end to your computer. Then turn the camera on.
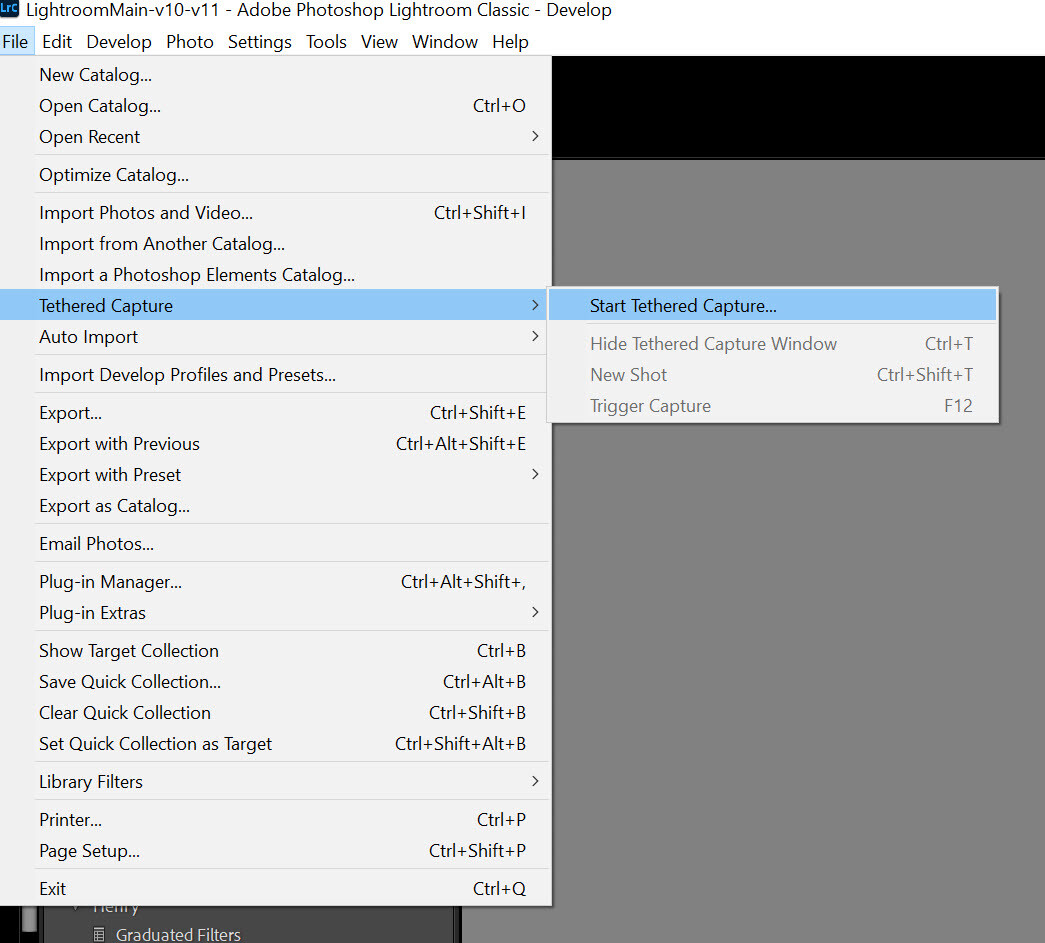
Step 2: Start Tethered Capture in Lightroom
Open Lightroom. Select File>Tethered Capture>Start Tethered Capture.
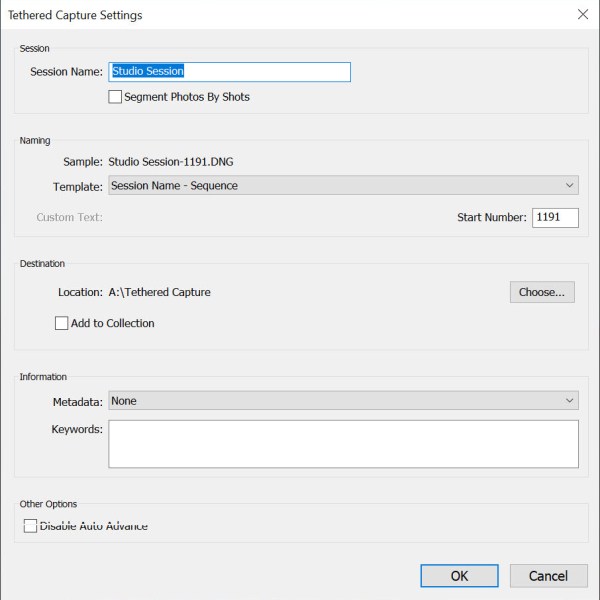
Step 3: Choose your tethered settings
In the Tethered Capture Settings dialog box, you can enter a session name, select a file naming template, pick a file destination, and apply metadata and keywords.
Pay careful attention to where the photos will be saved (you need to be able to find them later!).
Once you’re satisfied, click OK.
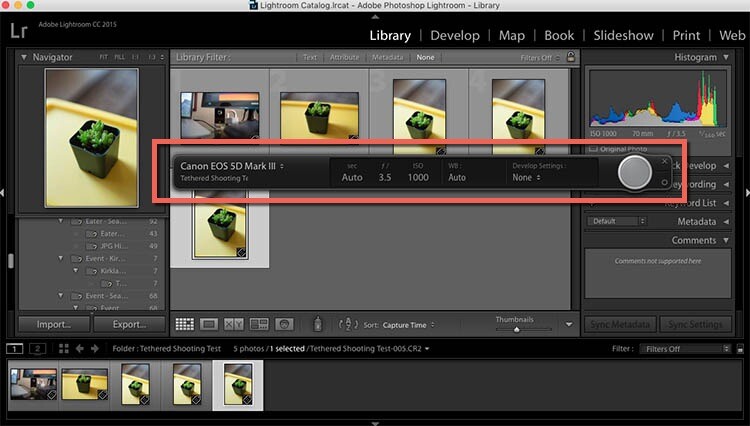
If all goes well, you’ll see the screen displayed below, with a narrow control panel and a Library where photos captured via the tethered shooting connection will appear. You should see your connected camera listed on the left-hand side:
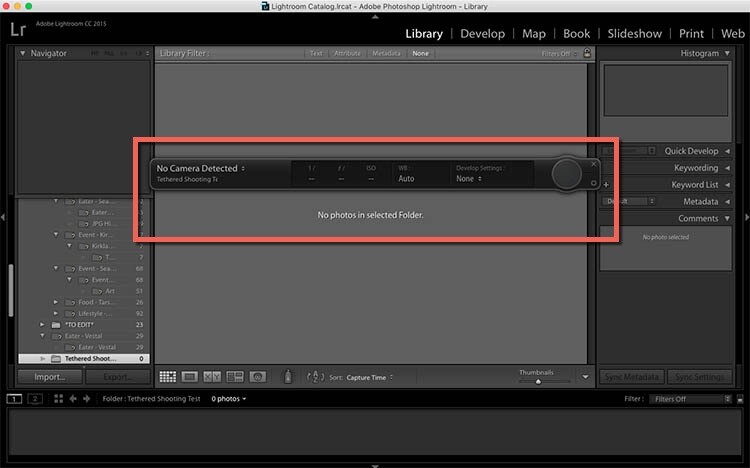
Lightroom sometimes has difficulty detecting the connected camera. In that case, you’ll get a No Camera Detected message:
If that happens, make sure your version of Lightroom and your camera’s firmware are up to date. Also, check to ensure your camera can do tethered capture in Lightroom. If your camera cannot tether in Lightroom, you can use a third-party plugin as a workaround; do a search for your camera model and you may find a solution.
Finally, try rotating through several different USB cables to make sure they’re working well.
If you’ve done all of the above and you still can’t get tethering to work, you might want to try tethering using a different program, such as EOS Utility:
Shooting tethered with EOS Utility
If you own a Canon camera, you can use the free EOS Utility software, which offers a simple tethering program. In my experience, this method is more reliable and consistent than Lightroom’s Tethered Capture option.
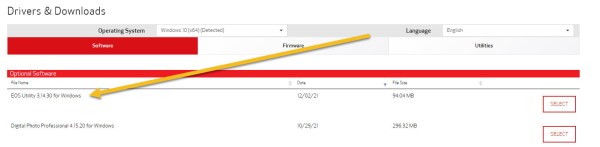
Step 1: Download EOS Utility and connect your camera
Head over to the Canon website, find your camera, then select the latest version of EOS Utility:
Download the program. Then – with your camera turned off – plug in your tethering cable. Turn your camera back on.
Open the EOS Utility program on your computer. The software should recognize your connected camera, which means you can then select the Remote shooting option:
Step 2: Work with the EOS Utility interface
Once you’ve successfully selected Remote Shooting, you should see the following interface:
The display lets you adjust certain settings from your computer, though there are some functions, such as lens zooming, that you’ll need to do manually.
Next, if you have the option, set your camera to Live View mode. Your camera display should appear on your computer screen, so you can see exactly what your camera sees.
Then, when you take a photo, the file will appear on your desktop!
You’ve made it this far, you could pop over and check out ‘best practices’ from the tethering geniuses at Tether Tools – Troubleshooting Tethering
Enhance your photoshoots with tethering!
Now that you’ve finished this article, you know how to shoot tethered in both Lightroom and EOS Utility. And you’re ready to do some high-quality product or portrait photography.
So connect your camera to your computer. Test out tethering. See what you think!
Now over to you:
What type of photoshoot do you plan on tethering? Which software will you use? Share your thoughts in the comments below!
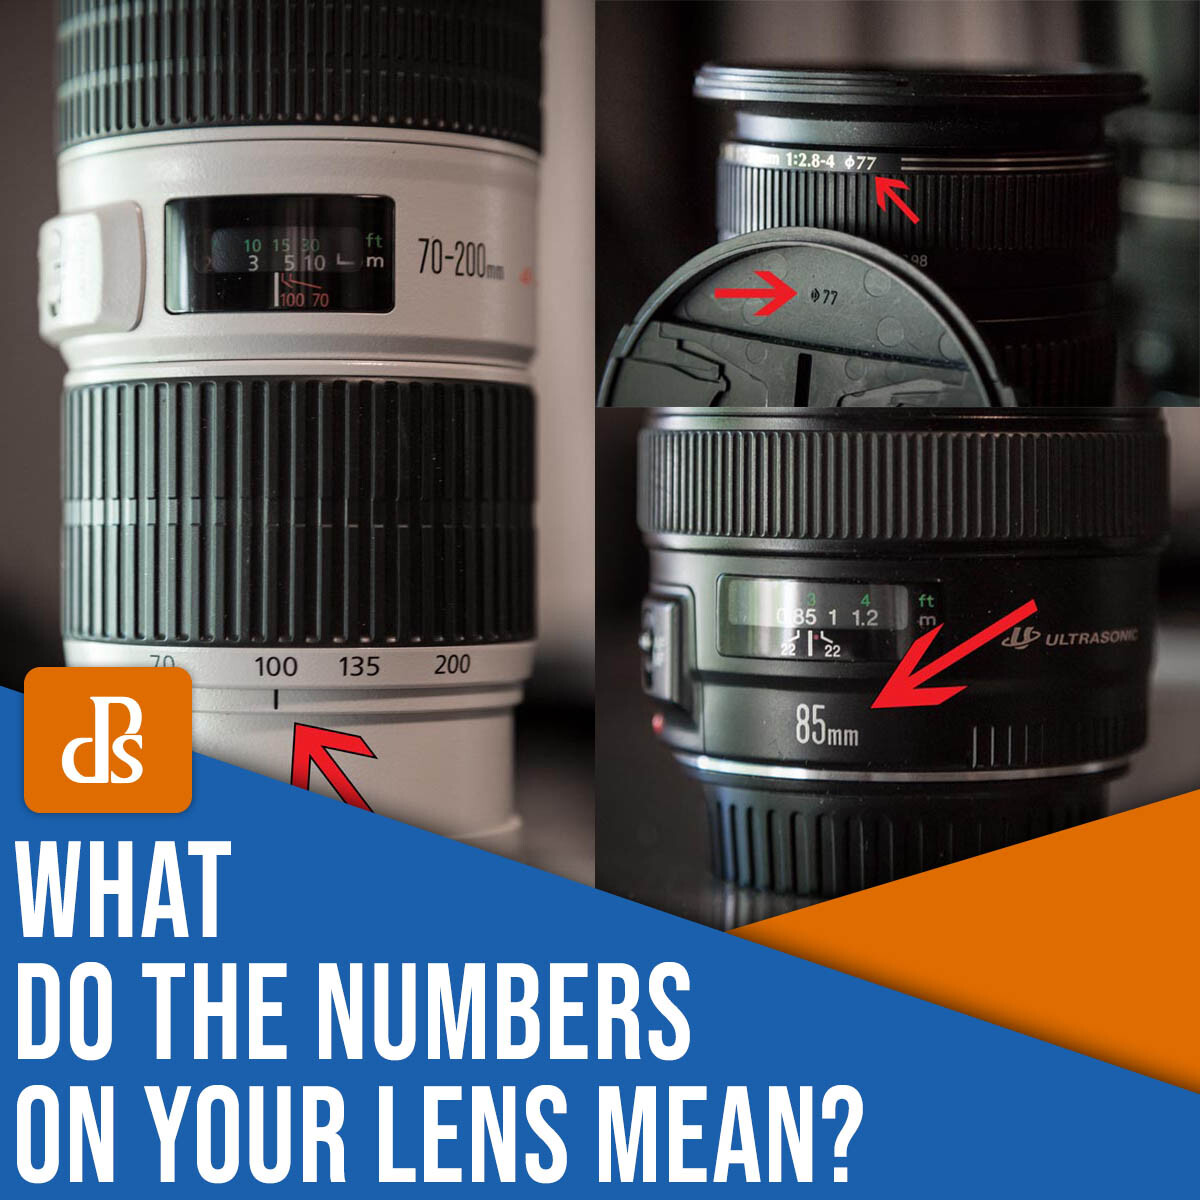
Camera lenses include quite a few numbers – and many of these are often confusing or obscure, especially for beginners.
That’s why, in this article, I’m going to run through all the important camera lens numbers you’ll encounter. I’ll explain what the numbers actually mean, and I’ll also explain why they matter for your photography.
By the time you’re finished, you’ll be a lens number expert, and you’ll never find yourself confused by your lens markings again.
Let’s jump right in.
Common numbers on newer digital lenses
Depending on the age of your lens, you’ll run into different markings. In this section, I’ll discuss numbers frequently found on newer lenses (though note that many will apply to old lenses, as well!).
Focal length
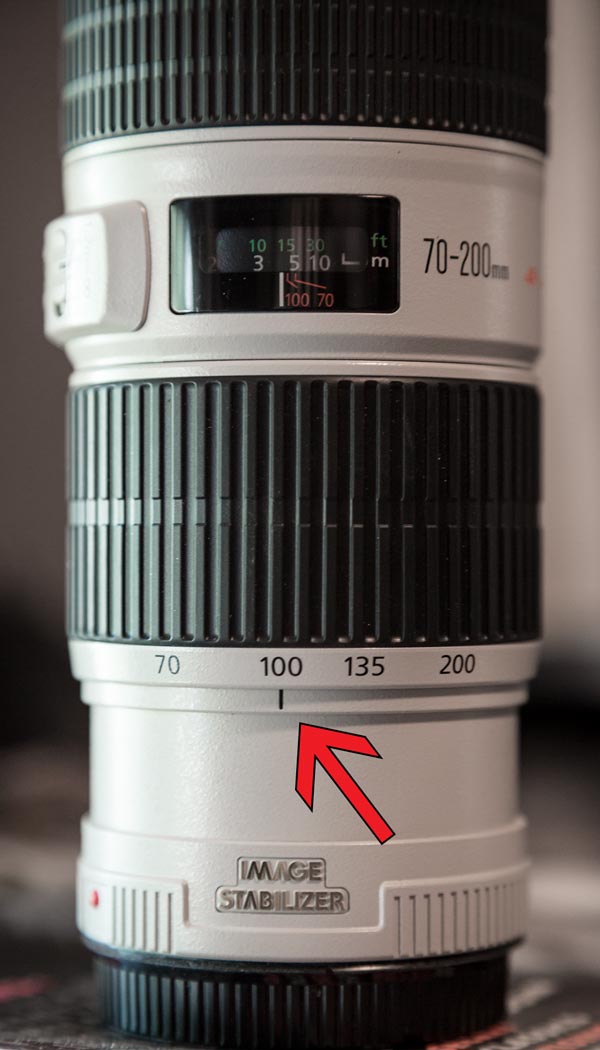
Zoom lenses feature a zoom ring; twist it, and your lens will zoom in and out.
Next to this ring, you’ll generally find focal length numbers. For example, if your lens is a 70-200mm zoom like mine (below), you’ll see markings that span from 70mm to 200mm. I’m currently at around 100mm:
A lens will never display every focal length but will instead offer a few useful intervals, as you can see in the image above.
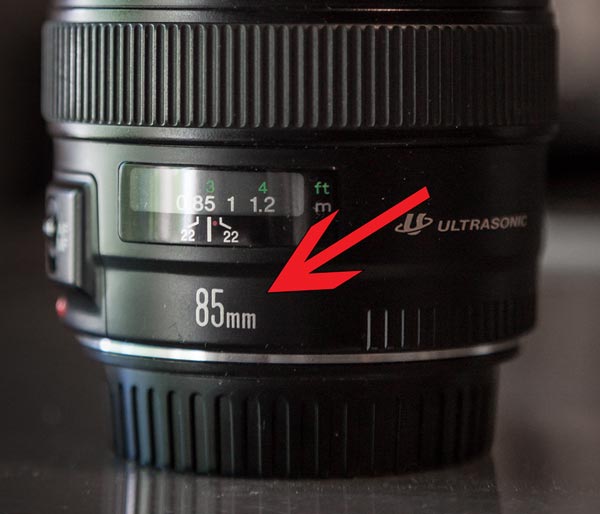
If you are using a prime or fixed lens, you won’t have a zoom ring. Your lens will simply indicate the focal length on its barrel, as you can see on my 85mm lens:
Maximum aperture
The maximum aperture is the largest aperture opening your lens is capable of achieving. Note that the larger the aperture opening, the smaller the f-number (so f/2.8 corresponds to a very wide aperture, while f/22 corresponds to a very small aperture).
Larger apertures like f/2.8 or even f/1.8 are highly desirable because they allow you to shoot in low-light conditions while maintaining a fast shutter speed. So the best lenses – and the most expensive lenses – tend to offer a very wide maximum aperture.
(Note that some zoom lenses have a variable maximum aperture, where the maximum aperture will change depending on the focal length; this is represented as a range of numbers, such as f/3.5-6.3.)
Now, pretty much every lens has the maximum aperture written somewhere on its body. You can usually find this information in one of two places (or perhaps even in both):
Right on the end of the lens barrel
On the front of the lens inside the filter ring area
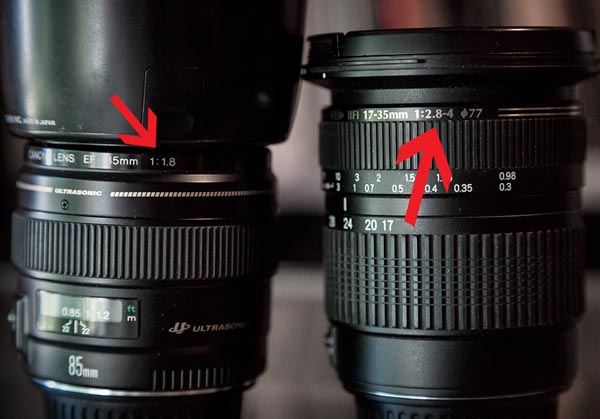
In the photo below, you can see two different lenses: my Tamron 17-35mm and my Canon 85mm. On the Tamron, you should see “1:2.8-4,” and on the 85mm, you should see “1:1.8.”
What does this mean? It’s simple: the maximum aperture on the 85mm lens is f/1.8, and on the Tamron zoom, the maximum aperture changes from f/2.8 to f/4 as you zoom the lens. (At the lens’s widest, 17mm, I can open the aperture to f/2.8. But if I zoom all the way to 35mm, my maximum aperture becomes f/4.)
These variable maximum apertures are pretty common with kit lenses, and especially kit lenses with a large focal length range such as 28-300mm or 18-200mm.
Focusing range and distance scale
On some – but not all! – lenses, you will see a range of distances, usually marked in two scales, feet and meters. These lens numbers indicate the distance at which your lens is currently focused.
So at one end of the scale, you’ll find the infinity symbol, and at the other end, you’ll find the lens’s minimum focusing distance (i.e., the closest the lens can focus).
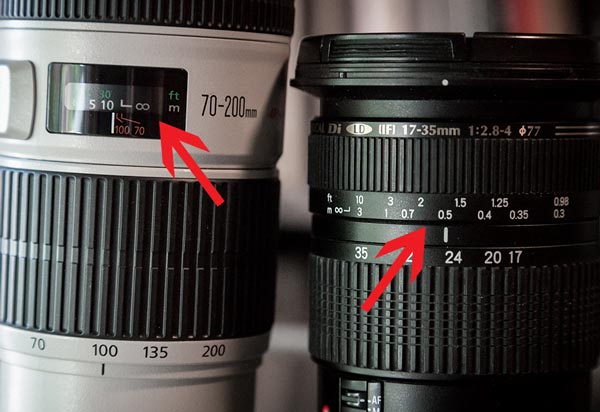
Check out the two lenses below. The distance scale on the 70-200mm (left) is under a cover, and you can see that the lens is focused somewhere between 10 meters and infinity. The distance scale on the 17-35mm (right) is on the lens’s focus ring, and you can see that the lens is focused quite close, at around 0.5 meters.
Note that, as you focus your lens, the distance scale will change to reflect your new point of focus.
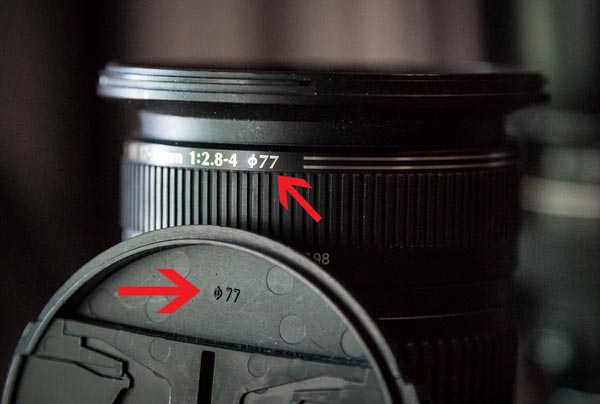
Lens diameter (filter size)
Every lens has a diameter, the distance across the center of the lens. This diameter also corresponds to the filter size (if the filter’s diameter doesn’t match the lens diameter, it won’t properly screw onto the front of the lens).
You’ll find the lens diameter written on the end of your lens (often on the edge of the barrel), preceded by a symbol that looks like a zero with a strike through it:
So for the lens pictured above, the diameter is 77mm. And if I wanted to use a polarizing filter or a clear filter, I’d need to grab one with an equivalent diameter.
By the way, you can also find the lens diameter on the back of the lens cap, as displayed above.
Less common lens numbers (often seen on older, manual focus lenses)
Now that you’re familiar with all the common camera lens numbers, let’s take a look at some of the less common markings. These numbers are pretty rare on lenses designed for digital cameras, but you may come across them if you purchase older, manual focus glass.
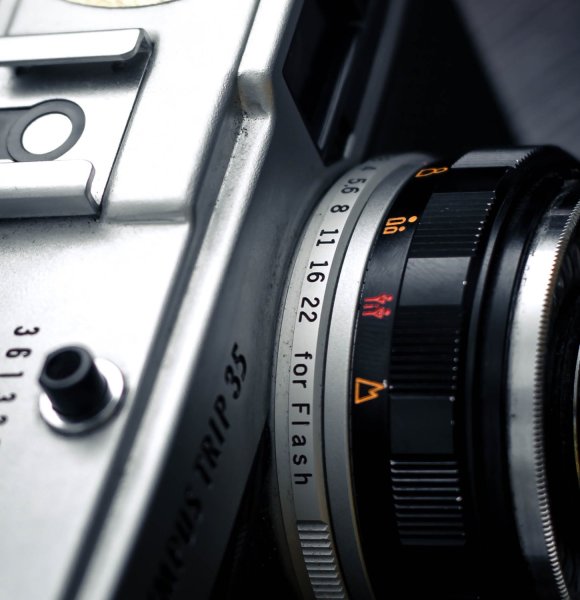
Aperture ring
Most newer lenses set and control the aperture through the camera. But back in the days of film, you would set the shutter speed on your camera and the aperture on the lens (via an aperture ring).
So while newer lenses rarely include aperture rings, you’ll find them on plenty of older lenses. An aperture ring displays different aperture settings, like this:
And by rotating the ring, you widen or narrow the aperture.
Note that some modern lenses do include aperture rings; Fujifilm is known for this, as are other brands that offer manual focus lenses (e.g., Samyang).
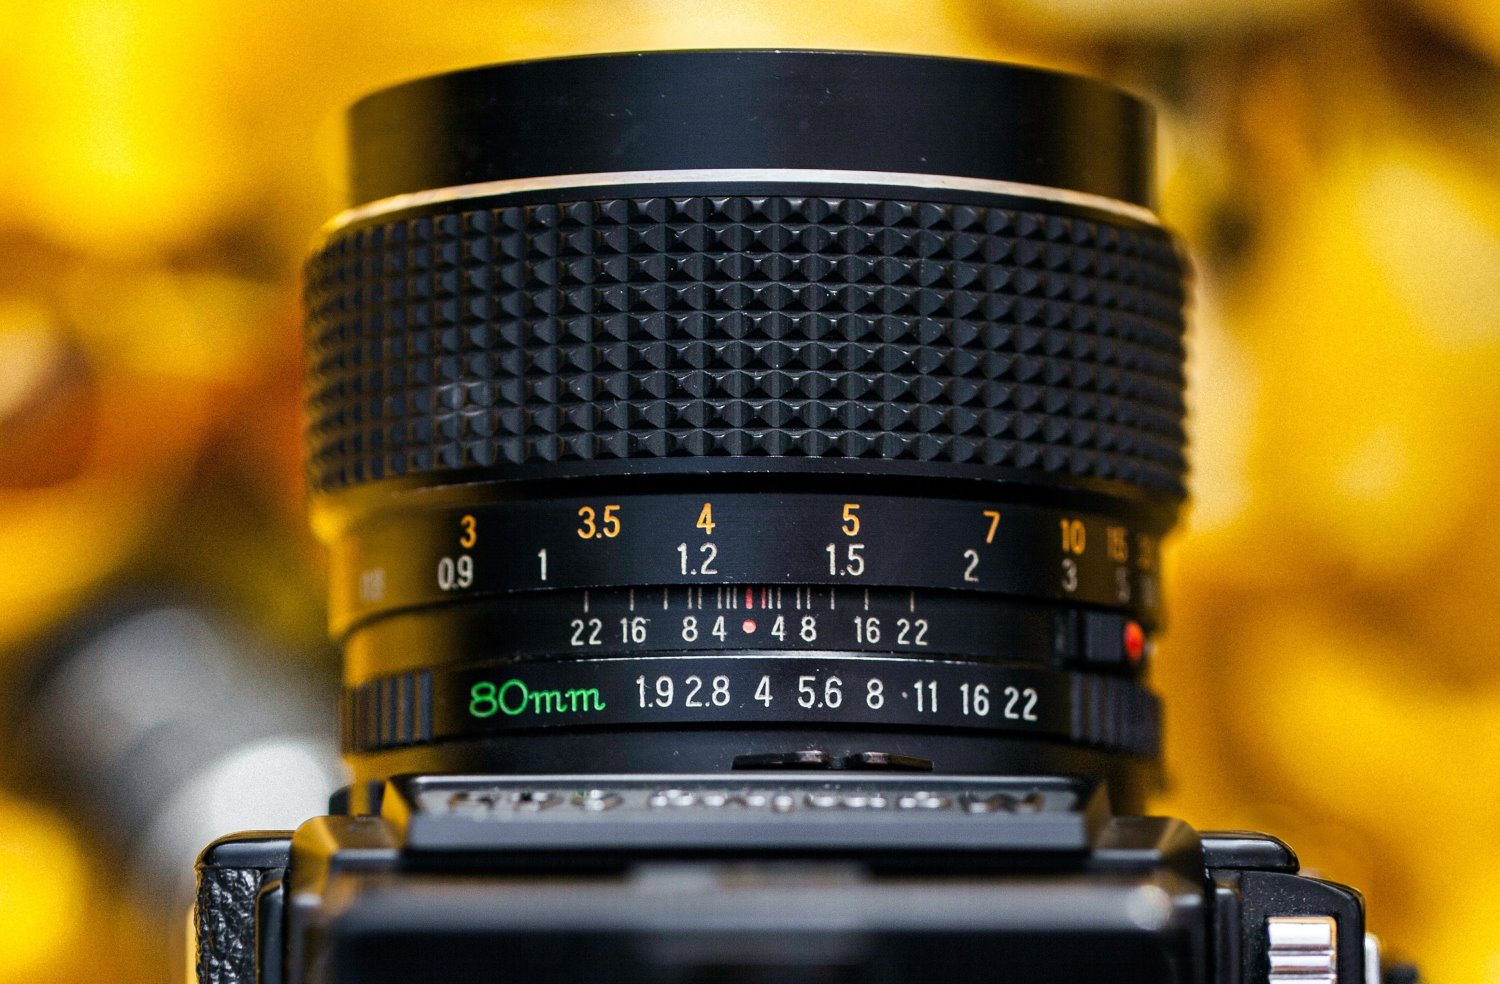
Hyperfocal distance scale
A hyperfocal distance scale helps you determine the depth of fieldfor a scene, given a particular focal length, point of focus, and aperture.
Most zoom lenses don’t offer hyperfocal distance scales (because depth of field varies with focal length). But if you have a prime lens – especially an older model – you may see an extra ring of numbers on the barrel, such as in the image below:
Note that, in the image, you can see three sets of numbers:
the distance scale
the hyperfocal distance scale
the aperture ring that actually sets the lens aperture
And this is by design. The hyperfocal distance scale uses the distance scale to display the expected depth of field. Here’s how it works:
First, focus your lens and set your aperture. Then look at the hyperfocal distance scale and find your chosen aperture on either side of the red line. Finally, look at the focusing distances that correspond to the apertures – these will be your near and far depth of field limit.
Make sense?
Camera lens numbers: final words
Well, that’s it for lens numbers! Hopefully, you now feel much more confident (and much less confused) when looking at your lens.
And if there are any lens numbers I missed, don’t worry – just share pictures in the comments below, and I’ll see what I can do to help out!